This project by Steven Muir appeared in our last issue of World Sweet World: Issue #9. Photos by Kate McPherson.
While around a quarter of all the energy we use in New Zealand is for transport, two thirds of the trips we actually make are less than six kilometres. If you calculate the embedded energy used to get your food on your table (how much energy is used for the farmer to fertilise the field, to run the tractor, package it, transport it to market, etc.), you are likely to double that amount by driving to the supermarket to do the shopping. It’s relatively easy to make big energy savings here and you’ll be better off health- and wallet-wise in the process.
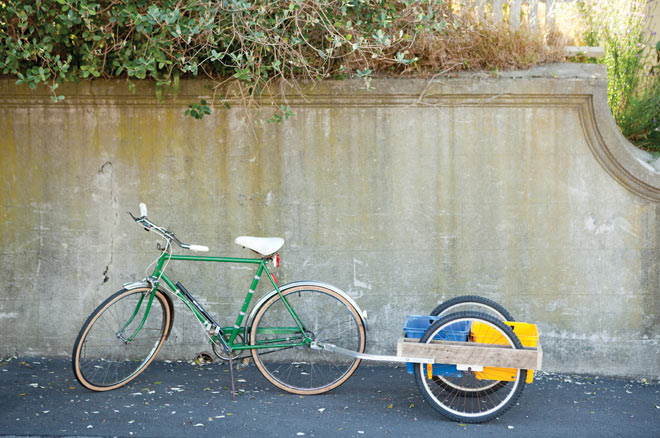
I got into making bike trailers a few years ago after I realised that most of my car use around town was for carrying stuff. I had attempted load-carrying with a bike by tediously stuffing and unloading too much shopping into panniers that were too small, putting my neck out carrying heavy loads in a backpack, falling off my bike when bags over the handlebars caught in my front spokes, and dropping cardboard boxes and contents all over the road that were precariously bungied onto a carrier. It was my bass guitar and amp that finally got me into constructing a trailer, and suddenly everything got much easier for load-carrying by bike. In this article I’ll describe how to make a wooden bike trailer using an aluminium hitch that I’m producing.
Obtaining your materials
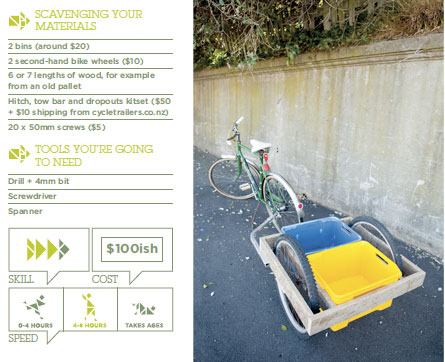
Bins: Two bins are very convenient for shopping as they fit in the shopping trolley for direct loading at the checkout. Making a trailer with a deck is ok, but the load sits higher and makes the trailer less stable, and things have to be bungied on. Avoid cheap and nasty bins as they crack easily – Bunnings, Mitre 10 and Stowers have good selections of strong bins for $10-$25 each. A free option is a couple of banana boxes with a strip of wood glued and screwed to the side. These will last a surprisingly long time if kept dry.
Second-hand bike wheels: 20†wheels are very good stability wise. 26†wheels on a narrow trailer are more prone to rolling with higher centre of gravity, but give good clearance for deep bins, although don’t use wheels any larger than this. 24†wheels are a good compromise between clearance and stability. Garage sales or dump shops are good places to find an old bike to pinch wheels off – using a set of wheels from the same bike (one front and one rear wheel) is quite acceptable. Check the bearings and re-grease if they are sticky. I’d also recommend you remove gear clusters, although this is not absolutely necessary.
Wood for the frame: 6 or 7 lengths of wood, around 800-1000mm long and between 75mm and 100mm wide and 25mm thick. Such wood can be easily obtained for free from old packing crates.
Hitch, tow bar and dropouts: Available by emailing steve@cycletrailers.co.nz, for $50 (+$10 to courier).
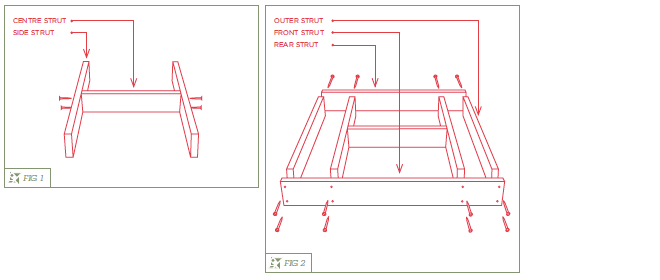
Create the H-frame FIG 1
1. The rectangular wooden frame is built to suit your chosen bins, which should be of equal size. Measure the longer width of your bin, just below the lip. Cut your centre strut to this length.
2. Calculate the lengths of the two side struts by measuring the shorter width of the bins (again, below the lip), multiply by two and then add the thickness of the centre strut. The outer struts of the completed frame are as long as the H-frame’s side struts, so cut four struts of this length.
3. Screw your ‘H’ together using two 50mm screws in each joint to make it strong.
Finish the frame FIG 2
4. To calculate the length of the front and rear struts, take the width of the H-frame, add the lengths of both wheel axles, and then add the widths of the two outer struts. It may help to measure the wheel axle by attaching the dropouts to the axle first and to then measure the distance from dropout to dropout.
5. The wheels’ axle lengths will be different, so when attaching the front and rear struts to the H-frame, make sure to leave the appropriate room on each side. Use two 50mm screws in each joint.
6. Finish the frame by attaching the outer struts so they sit flush with the ends of the
front and rear struts.
Attach the wheels FIG 3
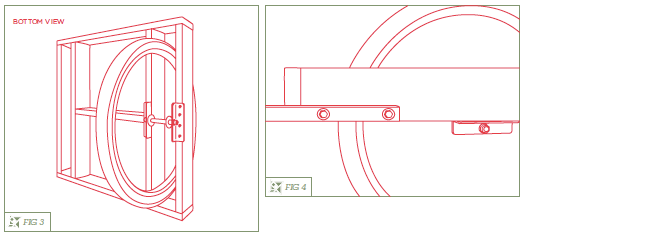
7. Drill at least four wholes through each dropout, and use 40-50mm screws to attach them to the underside of the frame, making sure the dropouts don’t hinder the bins going in and out. Hacksaw the
dropouts if required for bin clearance.
Attach the tow bar FIG 4
8. Attach the aluminium tow bar using the bolts provided. Drill the hole that’s closer to the end of the tube at least 25mm in from the end so it doesn’t collapse. The Nylocks provided don’t vibrate loose, so don’t over-tighten them, which could also result in collapsing the tube.
Attach the hitch FIG 5
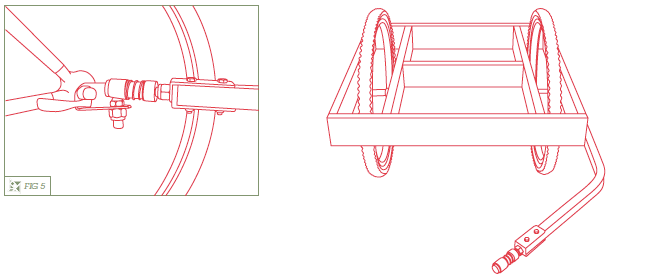
9. Attach the hitch base to your bike underneath the rear wheel nut or quick release lever (on the left hand side). The
hitch base stays on your bike all the time. It is important to horizontally level the hitch with the tow bar and quick-disconnect ball joint coupling to allow up/down movement over bumps. If there is a permanent angle on the tow ball there may not be enough play and the ball joint may bend or break.
It is also important to make sure the quick-disconnect ball joint coupling can rotate at least 90 degrees on the bolt thread in both horizontal directions. It would pay to get in the habit of checking this every time you connect the trailer on as it can tighten up over time and will damage the ball joint if it cannot rotate freely.
Weight test
Weight test the trailer by standing on it with your weight over the wheels. I recommend carrying loads less than 50kg routinely, with maybe an occasional load up to 70kg if it’s well balanced. Most people can pull 20kg up hills just by changing down a gear and going a bit slower, and you hardly notice it on the flat.
Loads of 30-40kg slow you down a bit more, but most people can still easily cruise at 15-20km/h, even with a heavy load.
Other resources
carryfreedom.com: I’m not the first to try a wooden bike trailer. Carry freedom have very good instructions for making a bamboo trailer (carryfreedom.com/bamboo.html), but bamboo can be difficult to source, whereas old pallets are very readily available. The site also describes how to make your own hitch, which is a bit more technically challenging.
cycletrailers.co.nz: My website has details on building various trailers, from one using an old bed frame, to a full aluminium model. You can get the hitch used in this project there, or learn how to make one using an old trampoline spring. For an overview of my trailer options, see ‘Product List’ on the site.


