Archive for the ‘Projects & ideas’ Category

Beet Blush

Thursday, February 4th, 2010

Okay so this is a bit more girly – but it was fun making it….

I definitely fall into the category of New Zealander who has OBVIOUSLY descended from a Scottish background.  Fair, pale, glowing and ghostly have all been words used to describe my complexion.  Sick of being constantly asked if I was, uh…sick, I realised blusher really helps.  But I hate spending money on make up, and wanted to make my own – without having to pinch my cheeks constantly.

So – Ms Josephine Fairley stepped forward with a solution. (Okay, well she wrote a few books about natural skin care – we haven’t actually met or communicated in any way, shape or form.)  She also has a column that I stole this from at http://www.wealdentimes.co.uk/health&beauty/beauty/wt84_beauty_own-cosmetics.asp

Beetroot and Glycerine Cheek and Lip Tint
You’ll need:
45g raw beetroot, grated
3 tablespoons vegetable glycerine

To make:
Put beetroot and glycerine in the top of a bain marie (double boiler). Heat gently for 15 minutes, cool, then strain into a small jug. Pour into a sealable container. Shake before use, then apply a dab on to your cheeks, blending well. Try smooshing it on your lips, too (it tastes delicious!).

I like to brag about my luck with this, because I just happened to be growing my own beetroot this summer – so it’s my home made, home grown beauty product.  I got vegetable glycerine from Homestead Health in Wellington, but it is readily available at health shops and most chemists.  I just asked at the counter and they poured me a bottle – I think it was $6 for 200ml, enough to make this several times over – not that I think I’ll need to, as a little goes a long way.

Libby

Basketcase

Friday, January 29th, 2010

As a big fan of summer salads, I’ve been enjoying my own salad greens grown literally on the door step!

Although I am lucky enough to have access to some garden space, there’s nothing better than popping out the front door to grab some lettuce or herbs to throw into a meal.  I found some old cane baskets at the recycling centre and have simply lined them with newspaper, filled in with potting mix and some lettuce!  With a flourish, I present you basket grown greens…

Of course, this isn’t limited to your salad greens – I’ve also got a few baskets of mint, chives, lavender, rosemary and even had some broad beans take off.  The baskets make for a cute, cottage-like appearance – but you can of course use garden pots and other random containers to spice up your stoop.   So give it a try – all they need is some sun, water and eating!

x Libby

Creamy Chickweed Pesto

Tuesday, December 22nd, 2009

This recipe is written by Johanna Knox (starcooked.blogspot.com)

Find out all about Chickweed (and Puha, aka Sow Thistle) here!

Ingredients

1 clove garlic
2 big pinches salt
2 cups chickweed snipped up and loosely packed
1/4 cup olive oil
1/2 cup cashew nuts, soaked for 24 hours (Soaking the nuts adds to the
creaminess and also makes them easier to digest.)
1/3 cup grated parmesan cheese

The pesto is pretty easy to make:

  1. Pound garlic and salt in a mortar.
  2. Gradually add chickweed, continuing to pound.
  3. Gradually add oil and nuts, until you have a smooth, thick paste. Alternatively, use a blender for all ingredients except the parmesan, and then stir in the parmesan at the end.

Makes over 1 cup of pesto. For a variation, substitute other greens or herbs for some of the chickweed. Yum!

Good Amy Hunting

Friday, December 18th, 2009

Amy Hunting makes amazing furniture and art pieces out of scrap wood and rubbish. I’m just blown away by it and want to start gluing cut-offs together. What a wicked idea – the Babooshka lamps, making a beautiful set of lamps (just like the Babushka or Matryoshka dolls – remember?), were cut out of one solid block of glued together wood pieces. Brilliant!

Amy Hunting chairAmy Hunting lamp family

Chocolate spice and orange Biscotti

Tuesday, December 8th, 2009

This is from Emma Cowan‘s article on Christmas, “‘Tis the season”, in the latest issue #8 of World Sweet World. We forgot to put the amount of flour in the ingredients list, sorry about that, so here’s the whole recipe.

BiscottiThese snappy biscuits are easy to make; they just take a little time. You bake the dough first, in little log shapes, then slice it thinly and bake it again. This recipe makes around 60.
1. Preheat the oven to 170°C
2. Beat the eggs with the sugar until pale and thick. Add the flour and baking powder, mix together, then divide the dough into two bowls.
3. Add the grated zest of an orange and the almonds to one bowl, and knead until the ingredients are combined and the dough is smooth. Add the cocoa and spices to the other bowl, mix through and then add the chocolate, kneading until combined.
4. Form each bowl of dough into two log shapes, then place on a baking tray with plenty of space between them. Bake them for 25 minutes, then remove to a cooling rack to cool completely (at least an hour).
5. Preheat the oven to 140°C
6. With a sharp knife, cut the logs into 1/2cm slices, then lay them out on a baking tray. Slice on an angle to make long thin shapes.
7. Bake for 15-20 minutes, until the biscotti are dry and just starting to brown. Remove and leave to cool on a rack. They will continue to harden as they cool.

Ingredients

2 cups raw sugar
4 eggs
Rind of one orange
4 cups of plain flour
1 t baking powder
1/2 cup raw almonds (with skin)
1/2 cup chopped chocolate
2 tablespoons cocoa
1 t cinnamon and a pinch of ground cardamom

Smarten your Snapper competition…

Monday, August 10th, 2009

Craft2.o is running a rather awesome competition along with snapper

It’s free and easy to enter. The prizes are:
-a snapper loaded with $100
-a free table at Craft2.0 wellington (awesome!)
The details are on the Craft2.0 website: http://www.craft2.org/blog/?p=1724
and a bit of extra inspiration
You could make:
screen printed snapper cover
knitted, crochet, felted snapper covers
soft toys as snapper covers
plastic and old books snapper covers
non practical snapper covers the snapper has to work there are no rules on the size f your cover
just remember snapper cards are
- the size of a credit card
- allergic to metal
- not good inside anything too thick

Yay, why not!!

tape 'n' tapes

Sunday, August 9th, 2009

Don’t forget Handmade Nation screening on Monday!

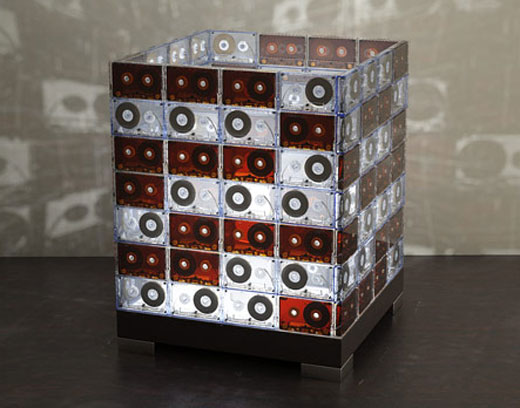
In the meantime, why not make a lamp out of all your old tapes? I found it here

cassette_tape_lamp_color

-greta

hung up

Thursday, July 30th, 2009

orange_print_crop

‘Zilka Recycled Hangers’

Clothes hangers made entirely from recycled British newspapers. Quite cool, though I wonder what happens to the other piece?

I found these for sale online at ‘Pure Design’

green hangerHmm, these claim to be the greenest of green hangers… “Green Hangers”
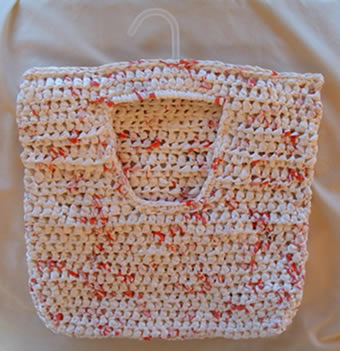
clothespinbagOr why not recycle an existing coat hanger into a peg bag? Free online tutorial here.

pegbagaor here, if you can’t crochet.

That’s enough from me, I’d better go sort out my wardrobe…

-Greta

What's in your drawers?

Wednesday, July 29th, 2009

Take a peek at http://papernstitchblog.com/

handmade goodies, design inspiration and general loveliness…

also features great articles for you ‘crafty business’ types:

drawers

What: The Paper N Stitch blog is a design and style blog that features artists, makers, crafters, and indie labels. In addition to these features, Paper N Stitch also features DIY projects and tutorials, fashion and home decor. The blog is updated with new posts 3-5 times a day

yum. – Greta

The office chair: a tutorial

Thursday, May 21st, 2009

Sue has asked for instructions on reupholstering the office chair, so I’ve written a quick tutorial. If you do this yourself, please email photos to joinin {at} worldsweetworld {dot} com- I’d love to see!

1. Take a photo of your chair. Before and after pics are great.

2. Turn the chair upside down and unscrew the seat from the frame. Keep the screws in a safe place.

3. Lie your piece of fabric face-down on the floor, with the seat on top of it (also facing down).

4. Cut the fabric so it’s about 10cm bigger than the seat (more is better than less though!)

5. Using a staple-gun, start stapling the fabric to the seat. Put a couple of staples in the middle of all four sides, further in than the existing staples you see. Make sure you pull the fabric nice and tight.

6. Keep working your way round the seat. When you get to the corners, be patient and staple a little bit at a time. You’re aiming to have nice smooth corners without visible gathers, when it’s looked at from the top. This can be a bit hit and miss! When you’re done, trim off the excess fabric.

7. Cut a rectangle of black fabric about the same size as the seat, and, turning the edges under as you go, staple this on to the bottom of the seat, covering the staples and untidy edges that you just made.

8. Find where the original screw holes are, and poke holes through the black fabric.

9. Reattach the seat to the frame.

10. Unscrew the back and take it off. How you do this will depend on the exact model of your chair, but remember how you did it, as you’ll have to put it back on in the same way.

11. Insert a screwdriver or a blunt knife under the plastic of the chair back, and lever the plastic off. Ours was attached in 4 places with a pop-together fastening system.

12. Unscrew the spine of the chair from the padded bit.

13. Staple your fabric on, following steps 3-6 again. It was more tricky with the back, as we were stapling into plastic this time, rather than wood, but it doesn’t have to be super neat, as you’ll cover it back up with the plastic.

14. Screw the spine back on, and reattach the plastic. I had to stand on it to do this, but then, I’m pretty weak.

15. Finally, reattach the spine to the base. Easy, eh!