Schickeda.nz

February 25th, 2016

Hello out there,

just in case you’re coming across this site on your travels: We have moved all our endeavours under one new website roof, called schickeda.nz!

You can follow our Liberty the Great housebus blog, or have a look at our work portfolio.

Thanks!

The new Schickedanz Design site!


Hello!

February 27th, 2014

This is for everyone who’s just stumbled upon World Sweet World or who’s been wondering what we’ve been up to lately. A lot of things have happened in the last while and we’ve started new endeavors. We have lived in Germany for two and a half years, and are back for a few months now and in the process of converting a schoolbus into a housebus. We have also set up Future Nature, where we offer web and print design services. Thanks all!

Future Nature web and print design

Liberty the Great, a house bus conversion

Wheelie bins

November 30th, 2010

While around a quarter of all the energy we use in New Zealand is for transport, two thirds of the trips we actually make are less than six kilometres. If you calculate the embedded energy used to get your food on your table (how much energy is used for the farmer to fertilise the field, to run the tractor, package it, transport it to market, etc.), you are likely to double that amount by driving to the supermarket to do the shopping. It’s relatively easy to make big energy savings here and you’ll be better off health- and wallet-wise in the process.
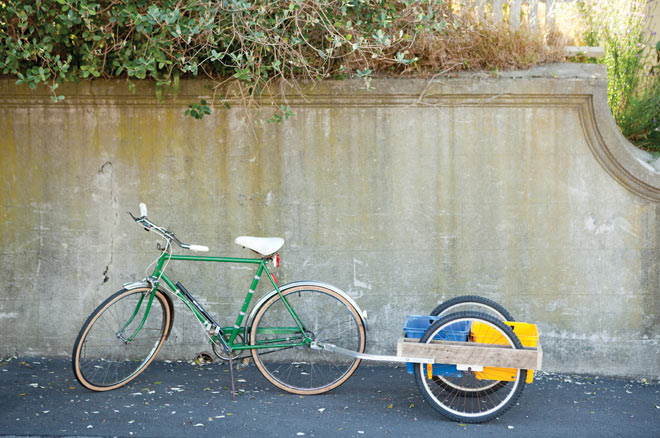
I got into making bike trailers a few years ago after I realised that most of my car use around town was for carrying stuff. I had attempted load-carrying with a bike by tediously stuffing and unloading too much shopping into panniers that were too small, putting my neck out carrying heavy loads in a backpack, falling off my bike when bags over the handlebars caught in my front spokes, and dropping cardboard boxes and contents all over the road that were precariously bungied onto a carrier. It was my bass guitar and amp that finally got me into constructing a trailer, and suddenly everything got much easier for load-carrying by bike. In this article I’ll describe how to make a wooden bike trailer using an aluminium hitch that I’m producing.

Obtaining your materials

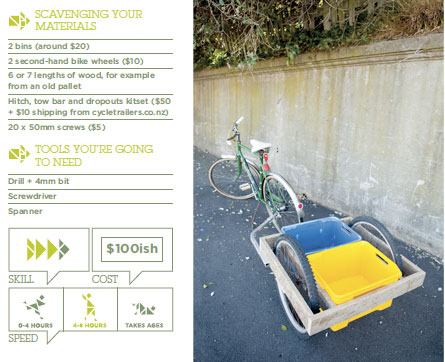
Bins: Two bins are very convenient for shopping as they fit in the shopping trolley for direct loading at the checkout. Making a trailer with a deck is ok, but the load sits higher and makes the trailer less stable, and things have to be bungied on. Avoid cheap and nasty bins as they crack easily – Bunnings, Mitre 10 and Stowers have good selections of strong bins for $10-$25 each. A free option is a couple of banana boxes with a strip of wood glued and screwed to the side. These will last a surprisingly long time if kept dry.
Second-hand bike wheels: 20” wheels are very good stability wise. 26” wheels on a narrow trailer are more prone to rolling with higher centre of gravity, but give good clearance for deep bins, although don’t use wheels any larger than this. 24” wheels are a good compromise between clearance and stability. Garage sales or dump shops are good places to find an old bike to pinch wheels off – using a set of wheels from the same bike (one front and one rear wheel) is quite acceptable. Check the bearings and re-grease if they are sticky. I’d also recommend you remove gear clusters, although this is not absolutely necessary.
Wood for the frame: 6 or 7 lengths of wood, around 800-1000mm long and between 75mm and 100mm wide and 25mm thick. Such wood can be easily obtained for free from old packing crates.
Hitch, tow bar and dropouts: Available by emailing steve@cycletrailers.co.nz, for $50 (+$10 to courier).

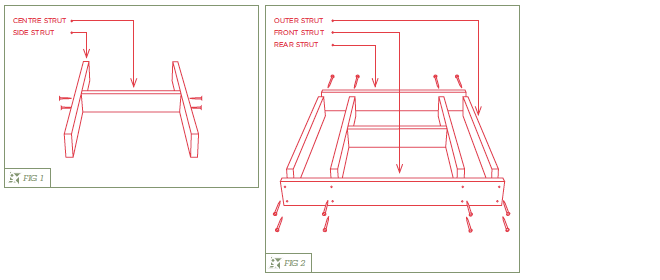
Create the H-frame FIG 1

1. The rectangular wooden frame is built to suit your chosen bins, which should be of equal size. Measure the longer width of your bin, just below the lip. Cut your centre strut to this length.
2. Calculate the lengths of the two side struts by measuring the shorter width of the bins (again, below the lip), multiply by two and then add the thickness of the centre strut. The outer struts of the completed frame are as long as the H-frame’s side struts, so cut four struts of this length.
3. Screw your ‘H’ together using two 50mm screws in each joint to make it strong.

Finish the frame FIG 2

4. To calculate the length of the front and rear struts, take the width of the H-frame, add the lengths of both wheel axles, and then add the widths of the two outer struts. It may help to measure the wheel axle by attaching the dropouts to the axle first and to then measure the distance from dropout to dropout.
5. The wheels’ axle lengths will be different, so when attaching the front and rear struts to the H-frame, make sure to leave the appropriate room on each side. Use two 50mm screws in each joint.
6. Finish the frame by attaching the outer struts so they sit flush with the ends of the
front and rear struts.
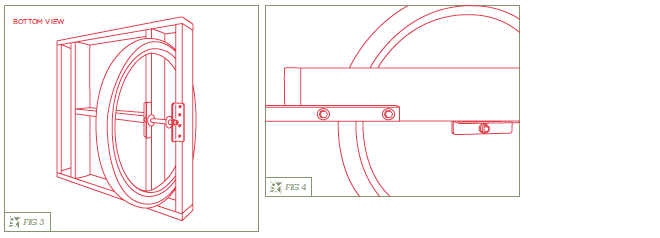
Attach the wheels FIG 3

7. Drill at least four wholes through each dropout, and use 40-50mm screws to attach them to the underside of the frame, making sure the dropouts don’t hinder the bins going in and out. Hacksaw the
dropouts if required for bin clearance.

Attach the tow bar FIG 4

8. Attach the aluminium tow bar using the bolts provided. Drill the hole that’s closer to the end of the tube at least 25mm in from the end so it doesn’t collapse. The Nylocks provided don’t vibrate loose, so don’t over-tighten them, which could also result in collapsing the tube.
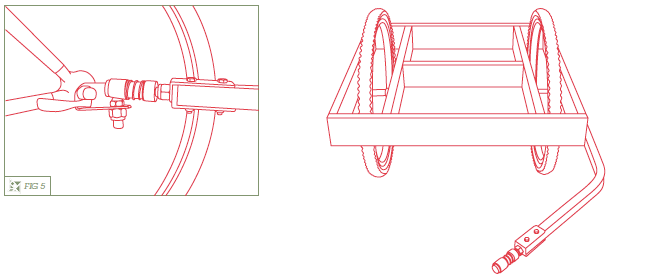
Attach the hitch FIG 5

9. Attach the hitch base to your bike underneath the rear wheel nut or quick release lever (on the left hand side). The
hitch base stays on your bike all the time. It is important to horizontally level the hitch with the tow bar and quick-disconnect ball joint coupling to allow up/down movement over bumps. If there is a permanent angle on the tow ball there may not be enough play and the ball joint may bend or break.
It is also important to make sure the quick-disconnect ball joint coupling can rotate at least 90 degrees on the bolt thread in both horizontal directions. It would pay to get in the habit of checking this every time you connect the trailer on as it can tighten up over time and will damage the ball joint if it cannot rotate freely.
Weight test

Weight test the trailer by standing on it with your weight over the wheels. I recommend carrying loads less than 50kg routinely, with maybe an occasional load up to 70kg if it’s well balanced. Most people can pull 20kg up hills just by changing down a gear and going a bit slower, and you hardly notice it on the flat.
Loads of 30-40kg slow you down a bit more, but most people can still easily cruise at 15-20km/h, even with a heavy load.
Other resources

carryfreedom.com: I’m not the first to try a wooden bike trailer. Carry freedom have very good instructions for making a bamboo trailer (carryfreedom.com/bamboo.html), but bamboo can be difficult to source, whereas old pallets are very readily available. The site also describes how to make your own hitch, which is a bit more technically challenging.
cycletrailers.co.nz: My website has details on building various trailers, from one using an old bed frame, to a full aluminium model. You can get the hitch used in this project there, or learn how to make one using an old trampoline spring. For an overview of my trailer options, see ‘Product List’ on the site.

Workspace makeover

October 23rd, 2010

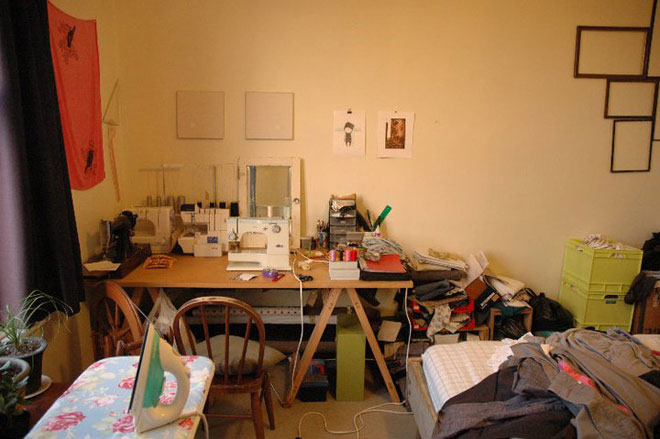
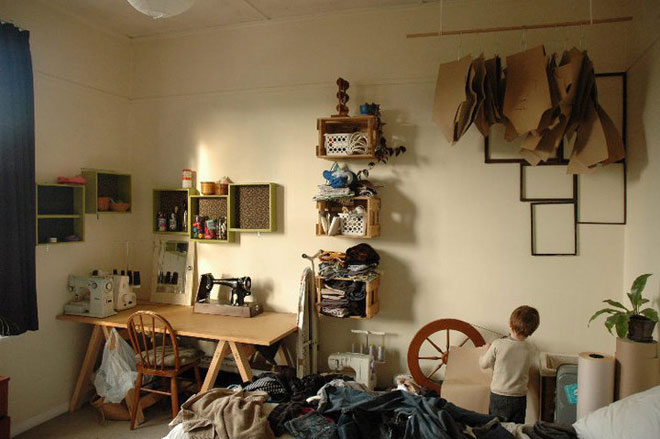
Look at what our clever friends Matt and Bonnie, formerly Lone Moose, did with their workspace/bedroom/storage area. So multifunctional, and now uncluttered:

BEFORE / AFTER

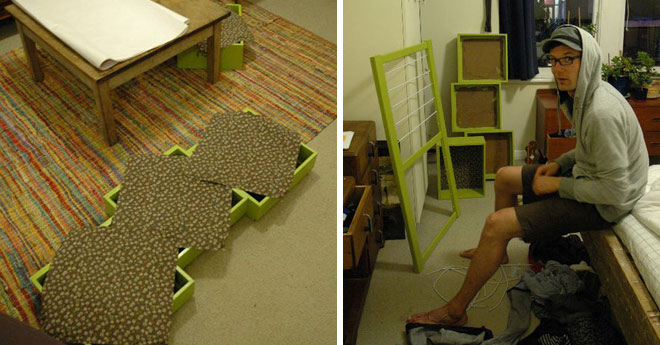
MAKING

Preparing the drawers before going on the wall, and painting the new pulley rack. They followed our Pulley Rack Project instructions from World Sweet World Magazine issue #8 – you can check out the whole project here.

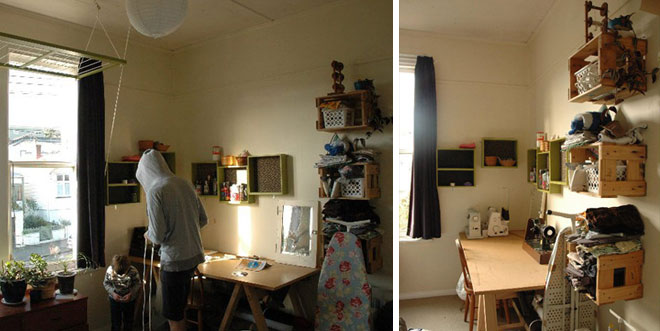
NEW WORKSPACE ALL DONE

Thanks, Bonnie, Matt and Theo!

-Thomas

The Pulley Rack: Your Rainy Day or Gardenless Clothes Drying Solution

October 23rd, 2010

I dream of being able to string up a clothes line from my bedroom window to the ones on the other side; our busy city street transformed into a lazy village lane, our washing waving in the wind like bunting. Sadly, it is not to be – the windows opposite belong to a huge office block and undies flapping about outside is simply not the corporate way.

We have had to come up with a less obtrusive way to dry our clothes; the Pulley Drying Rack, not so picturesque but just as old skool. Known in another gender stereotyped life as a Lazy Betty or a Pulley Maid, the Pulley Drying Rack is friend to all who dwell in abodes without gardens and friendly neighbours across the street.

GETTING STARTED

  1. Work out where you would like your indoor clothesline. Think about roof height, usual temperature of the room, sunshine, and proximity to the washing machine. We chose the
    laundry. You’ll be screwing it to the ceiling, so you’ll need to note where the studs are. A stud-finder can help with this, and they’re pretty inexpensive from the hardware store.
  2. Dig around at the dump shop or building recyclers for a frame. Think framing in old cupboards or cupboard doors, or even louvred doors (you’d have to cut the louvres out). Look for a sturdy frame that doesn’t weigh too much. Alternatively, if all else fails, grab four lengths of wood and make the frame yourself, using a screw for each corner.
  3. Evenly space the screw eyes horizontally on the inside along the frame. Pre-drilling with a tiny drill bit makes screwing in the eyes a whole lot easier. Do this on two sides of the frame, making sure the screw eyes are directly opposite each other FIG 1.
  4. Cut your plastic-coated curtain wire into lengths, about 7cm shorter than the inside width of the frame. Screw a screw hook into each end of each curtain wire (the wire is a bit like a tightly-wound spring, so they’ll screw in, but it’ll be a tight fit). Each curtain wire has to stretch a bit now when you hook it up FIG 2.
  5. Drill four vertical holes, one on each corner of the frame FIG 3.
  6. Cut two lengths of rope as long as the width of the frame, add 50% again. These need to be
    exactly the same lengths (I’ll call these now the support ropes). In the middle of each of these
    support ropes tie in a loop.
  7. Feed each of the ends through a corner hole that you have just drilled, then tie a gnarly knot on the end so they can’t fit back through. These should form an ‘A’ shape on each end of the frame FIG 4. You now have your main structure sorted, the next is to attach it to the roof!
  8. In the ceiling you need to find where the cross beams in your roof are located. You need to drill two holes through the ceiling into these crossbeams in order to attach the big hooks. The hooks, and therefore the holes, need to be above the middle of the two ‘A’ frame support ropes. Accurate
    positioning is crucial.
  9. Screw in the big hooks, then hang the pulleys onto them.
  10. In the same way you found a strong bit to screw in the hooks, now place and attach another hook at waist height on a wall (where the clothesline will eventually be anchored) and the eyelet, or a double pulley, in the junction of the ceiling and wall above this last hook.
  11. A length of the wax coated rope now needs to be tied to each of the loops in the middle of the support ropes. These lengths of rope will both individually go up, through the appropriate
    pulley, then together pass through the big eyelet, then be tied off together in two positions FIG 5. Firstly, the longest part, where the lowered clothesline will sit when you are hanging up the washing, and secondly, a knot further up the rope, where the clothesline will be anchored when it is pulled up close to the ceiling.

MAINTENANCE

Every so often make sure the anchor hooks and eyelets are all still secure and safe. When it comes to drying clothes this rack is a life saver but it would knock you for six if it dropped on your head. Eek.

EXTRA TIP

An extra benefit of this drying rack is that we have all become arm wrestling champions since having to heave it up and down on a regular basis. Seriously though, if we were to do this again we’d tee up some sort of counter weight system so it’s less of a strain to pull up when laden with wet clothes. If you’re not up to that task, just make a smaller rack.

Bikes and fashion go together

October 17th, 2010

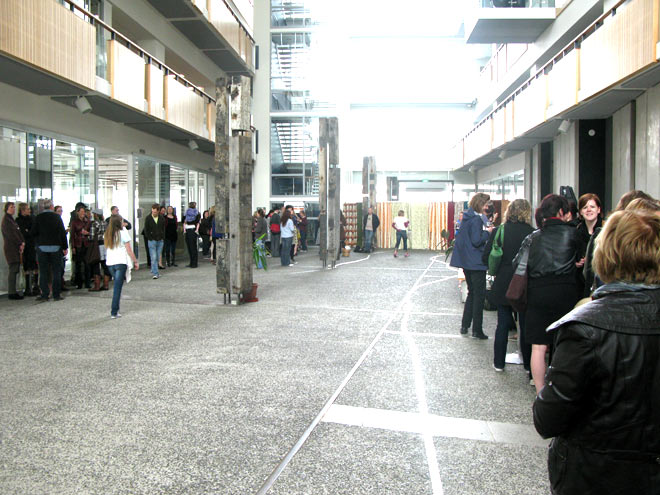
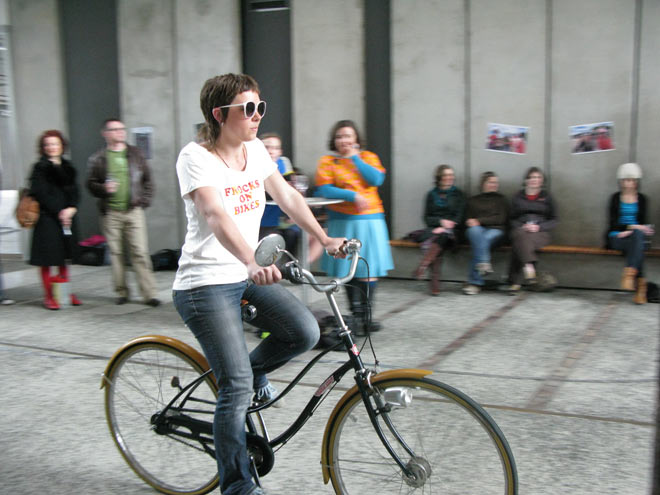
We went to Wheel Stylish yesterday, the bike fashion show in Wellington, put together by the clever folks from Frocks on Bikes Wellington at the BNZ Harbour Quays Atrium. A nice concept: bring city bikes and sustainable fashion together and show cycling can be very stylish.

The better part of World Sweet World, Hannah, was taking part in it as a model, and happily showed off pieces by kowtow. The other labels were emma, starfish, voon and de nada, and there were some pieces from hunters and collectors, all presented by a number of other beautiful models, but the actual combinations of labels and models completely escaped me, having to juggle Otis and at the same time trying to aim at moving fashion targets.

The other main ingredient of the show, the bikes: they were personal beauties and showpieces, and a handful of mamachari bikes Jason and the crew donated for the day. Tres chic – the Cycle Chic Fashion show:

-Thomas

World Sweet World, by Erin Cole Baker

October 16th, 2010

Wow, it’s great to listen to such a pretty song that was written just for us!

Oh, hang on… No, it doesn’t actually have anything to do with us; but that would be nice. Just came across the new song by Erin Cole-Baker, called World Sweet World. Downright creative, the entire video was shot and edited within only one day – shows good things don’t always take time.

So who is this Erin Cole-Baker? A quick search makes me think that we do live in a small world – Erin lives in Oregon, but grew up in New Zealand. She grew up with jazz, rock, blues and bluegrass in her home – and you can certainly hear a great confidence in her music.

Erin’s website is made beautifully in loving handmade style by Phil Austen and Toni Brandso. Have a look: “I will be playing music for the rest of my life” – how endearing is that? I hope she will.

Thomas

Cheap As Chipped China – redesigned

September 14th, 2010

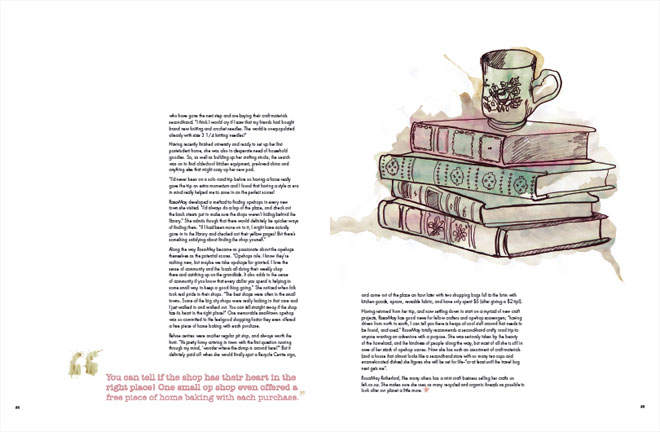
As a school project, Natcoll design student Marie Holdaway recently re-illustrated ‘Cheap As Chipped China’, Issue #8 of World Sweet World Magazine, by Kura Rutherford. Great to see how people reuse material, put their talent to work and create something new. Marie illustrated the article with the frankie magazine in mind, and found her inspiration at Lovely Sweet William.

Cheap as chipped china

September 12th, 2010

When keen crafter Rosa May Rutherford bought her first car and found herself with both time on her hands and a growing sense of adventure, she hatched a plan to drive from one end of the country to the other, stopping at every small-town op shop along the way.

Inspired by Ann Packer’s book Crafty Girls’ Road Trip, twenty-four-year old Rosa decided to put her own spin on the fun concept. With a tight budget and little ‘all weather’ driving experience, Rosa was determined nonetheless. She had a plan: to put on loud music, fill her car with petrol and drive from the far north of New Zealand to the deep south, not returning home until her wee Mazda 323 was jam-packed full of second-hand stuff she could fill her house with, or repurpose for craft projects.

Having fun, catching up with friends along the way, and seeing new bits of New Zealand were high priority, but Rosa’s trip was also strongly informed by her staunch belief that craft-making is made all the better by reusing resources. ‘There is so much out there to be reused’ she says, ‘and I was determined to go out and find lots of it.’

While, she says, it’s great how the majority of crafty New Zealanders will now purchase 100 per cent natural fibres, she is inspired most by the people who have gone the next step and are buying their craft materials second-hand. ‘I think I would cry if I saw that my friends had bought brand new knitting and crochet needles. The world is overpopulated already with size 3 1/4 knitting needles!’

‘I’d never been on a solo road trip before so having a focus really gave the trip an extra momentum and I found that having a style or era in mind really helped me to hone in on the perfect scores! When I arrived in some small towns, it was a bit of a downer being by myself, but knowing there were op shops just waiting to be explored made it ok.’

Rosa developed a method to finding op shops in every new town she visited. ‘I’d always do a lap of town, and check out the back streets just to make sure the shops weren’t hiding behind the library.’ She admits though that there would definitely be quicker ways of finding them. ‘If I had been more on to it, I might have actually gone in to the library and checked out their yellow pages! But there’s something satisfying about finding the shop yourself.’

Along the way Rosa became as passionate about the op shops themselves as the potential scores. ‘Op shops rule. I know they’re nothing new, but maybe we take op shops for granted. I love the sense of community and the locals all doing their weekly shop there and catching up on the grandkids. It also adds to the sense of community if you know that every dollar you spend is helping in some small way to keep a good thing going.’ She noticed the places that really took pride in their shops. ‘Some people really make an effort to make their shops interesting and appealing, and that’s inspiring. The best shops were often in the small towns. Some of the big city shops were really lacking in that care – and I just walked in and walked out. You can tell if the shop has their heart in the right place! One small op shop even offered a free piece of home baking with each purchase.’

Refuse centres were another regular pit stop, and great places to ferret around. ‘It’s pretty funny arriving in town with the first question running through my mind – “wonder where the dump is around here!” But it definitely paid off when she would finally spot a Recycle Centre sign, and come out an hour later with two shopping bags full to the brim with kitchen goods, aprons, reusable fabric and have only spent $5, after giving a $2 tip!

Having returned from her trip, and now settling down to start on a myriad of new craft projects, Rosa has good news for fellow crafters and op shop scavengers; ‘having driven from north to south, I can tell you there is heaps of cool stuff around that needs to be found, and used.’ Rosa May totally recommends a second-hand crafty road trip to anyone wanting an adventure. She was overwhelmed by the beauty of the homeland, and the kindness of people along the way, but most of all she is still in awe of her stack of op shop scores.

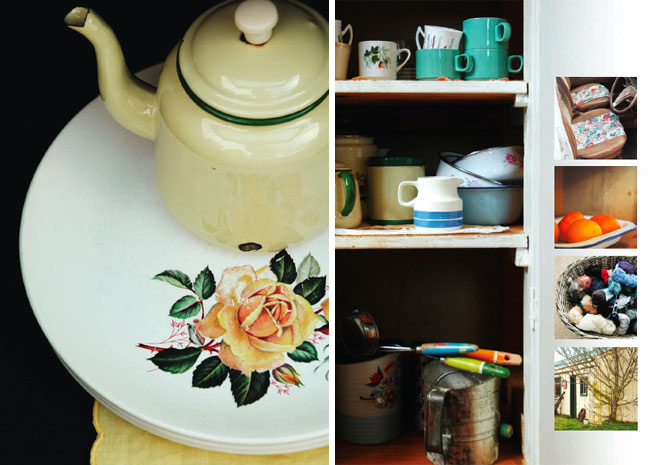
Rosa May, like many others, has a mini craft business selling her crafts on felt.co.nz. ‘I want to look after our planet, so I make sure I use as many recycled and organic threads as possible.’ Now she has such an assortment of craft materials (and a house that almost looks like a second-hand store, with so many tea cups and enamel coated dishes) she figures she and her wee business will be set for life – ‘or at least until the travel bug next gets me’.

Barebones & Cabaret

August 26th, 2010

We just heard from one of our musical friends from the North, Barebones & Cabaret (they were one of the gifted guys who appeared on our last year’s “Summer mixed tape“). They released their self titled début album early this year and it’s very worth listening to. Care-free, summery, camp-fire tunes – check them out for free, make a donation, listen to them, and enjoy!

Barebones & Cabaret

-Thomas