Posts Tagged ‘recycling’

Wheelie bins

Tuesday, November 30th, 2010

While around a quarter of all the energy we use in New Zealand is for transport, two thirds of the trips we actually make are less than six kilometres. If you calculate the embedded energy used to get your food on your table (how much energy is used for the farmer to fertilise the field, to run the tractor, package it, transport it to market, etc.), you are likely to double that amount by driving to the supermarket to do the shopping. It’s relatively easy to make big energy savings here and you’ll be better off health- and wallet-wise in the process.
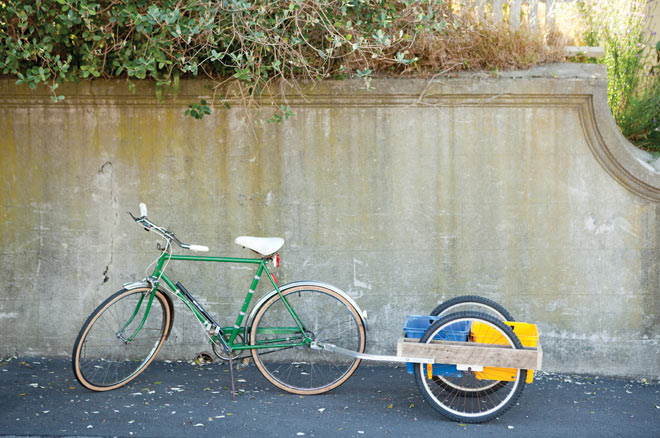
I got into making bike trailers a few years ago after I realised that most of my car use around town was for carrying stuff. I had attempted load-carrying with a bike by tediously stuffing and unloading too much shopping into panniers that were too small, putting my neck out carrying heavy loads in a backpack, falling off my bike when bags over the handlebars caught in my front spokes, and dropping cardboard boxes and contents all over the road that were precariously bungied onto a carrier. It was my bass guitar and amp that finally got me into constructing a trailer, and suddenly everything got much easier for load-carrying by bike. In this article I’ll describe how to make a wooden bike trailer using an aluminium hitch that I’m producing.

Obtaining your materials

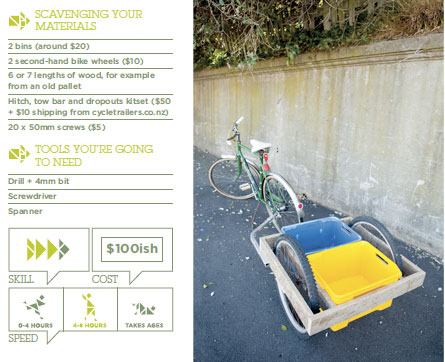
Bins: Two bins are very convenient for shopping as they fit in the shopping trolley for direct loading at the checkout. Making a trailer with a deck is ok, but the load sits higher and makes the trailer less stable, and things have to be bungied on. Avoid cheap and nasty bins as they crack easily – Bunnings, Mitre 10 and Stowers have good selections of strong bins for $10-$25 each. A free option is a couple of banana boxes with a strip of wood glued and screwed to the side. These will last a surprisingly long time if kept dry.
Second-hand bike wheels: 20” wheels are very good stability wise. 26” wheels on a narrow trailer are more prone to rolling with higher centre of gravity, but give good clearance for deep bins, although don’t use wheels any larger than this. 24” wheels are a good compromise between clearance and stability. Garage sales or dump shops are good places to find an old bike to pinch wheels off – using a set of wheels from the same bike (one front and one rear wheel) is quite acceptable. Check the bearings and re-grease if they are sticky. I’d also recommend you remove gear clusters, although this is not absolutely necessary.
Wood for the frame: 6 or 7 lengths of wood, around 800-1000mm long and between 75mm and 100mm wide and 25mm thick. Such wood can be easily obtained for free from old packing crates.
Hitch, tow bar and dropouts: Available by emailing steve@cycletrailers.co.nz, for $50 (+$10 to courier).

Create the H-frame FIG 1

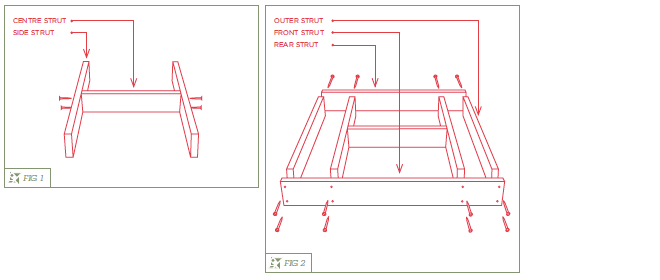
1. The rectangular wooden frame is built to suit your chosen bins, which should be of equal size. Measure the longer width of your bin, just below the lip. Cut your centre strut to this length.
2. Calculate the lengths of the two side struts by measuring the shorter width of the bins (again, below the lip), multiply by two and then add the thickness of the centre strut. The outer struts of the completed frame are as long as the H-frame’s side struts, so cut four struts of this length.
3. Screw your ‘H’ together using two 50mm screws in each joint to make it strong.

Finish the frame FIG 2

4. To calculate the length of the front and rear struts, take the width of the H-frame, add the lengths of both wheel axles, and then add the widths of the two outer struts. It may help to measure the wheel axle by attaching the dropouts to the axle first and to then measure the distance from dropout to dropout.
5. The wheels’ axle lengths will be different, so when attaching the front and rear struts to the H-frame, make sure to leave the appropriate room on each side. Use two 50mm screws in each joint.
6. Finish the frame by attaching the outer struts so they sit flush with the ends of the
front and rear struts.
Attach the wheels FIG 3

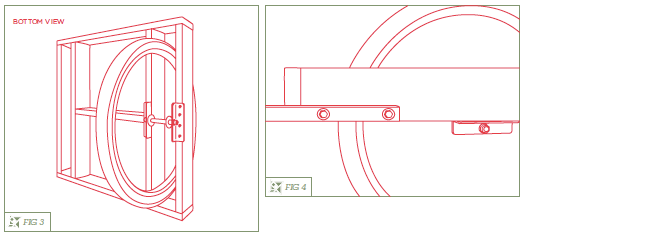
7. Drill at least four wholes through each dropout, and use 40-50mm screws to attach them to the underside of the frame, making sure the dropouts don’t hinder the bins going in and out. Hacksaw the
dropouts if required for bin clearance.

Attach the tow bar FIG 4

8. Attach the aluminium tow bar using the bolts provided. Drill the hole that’s closer to the end of the tube at least 25mm in from the end so it doesn’t collapse. The Nylocks provided don’t vibrate loose, so don’t over-tighten them, which could also result in collapsing the tube.
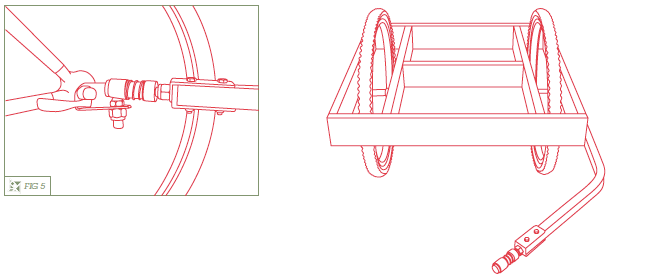
Attach the hitch FIG 5

9. Attach the hitch base to your bike underneath the rear wheel nut or quick release lever (on the left hand side). The
hitch base stays on your bike all the time. It is important to horizontally level the hitch with the tow bar and quick-disconnect ball joint coupling to allow up/down movement over bumps. If there is a permanent angle on the tow ball there may not be enough play and the ball joint may bend or break.
It is also important to make sure the quick-disconnect ball joint coupling can rotate at least 90 degrees on the bolt thread in both horizontal directions. It would pay to get in the habit of checking this every time you connect the trailer on as it can tighten up over time and will damage the ball joint if it cannot rotate freely.
Weight test

Weight test the trailer by standing on it with your weight over the wheels. I recommend carrying loads less than 50kg routinely, with maybe an occasional load up to 70kg if it’s well balanced. Most people can pull 20kg up hills just by changing down a gear and going a bit slower, and you hardly notice it on the flat.
Loads of 30-40kg slow you down a bit more, but most people can still easily cruise at 15-20km/h, even with a heavy load.
Other resources

carryfreedom.com: I’m not the first to try a wooden bike trailer. Carry freedom have very good instructions for making a bamboo trailer (carryfreedom.com/bamboo.html), but bamboo can be difficult to source, whereas old pallets are very readily available. The site also describes how to make your own hitch, which is a bit more technically challenging.
cycletrailers.co.nz: My website has details on building various trailers, from one using an old bed frame, to a full aluminium model. You can get the hitch used in this project there, or learn how to make one using an old trampoline spring. For an overview of my trailer options, see ‘Product List’ on the site.

Workspace makeover

Saturday, October 23rd, 2010

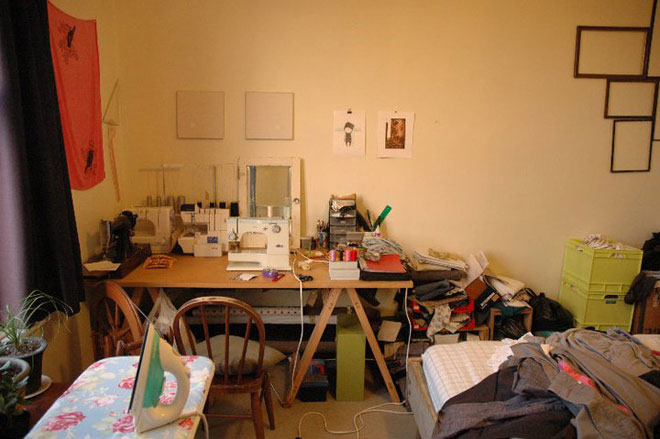
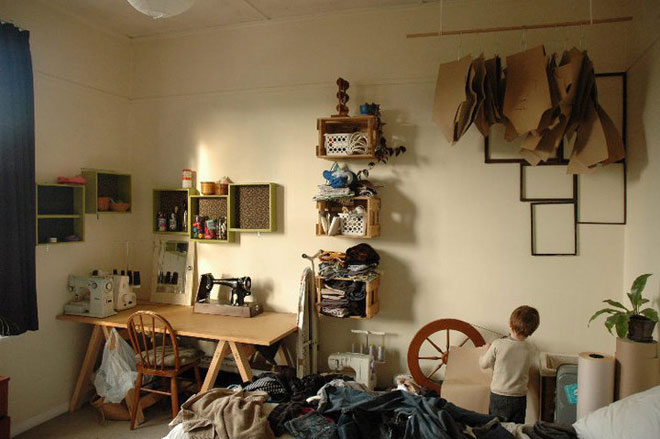
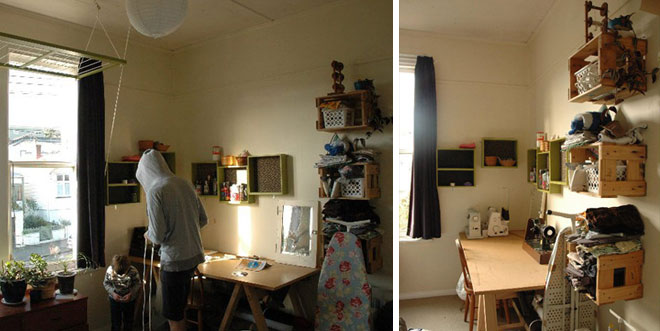
Look at what our clever friends Matt and Bonnie, formerly Lone Moose, did with their workspace/bedroom/storage area. So multifunctional, and now uncluttered:

BEFORE / AFTER

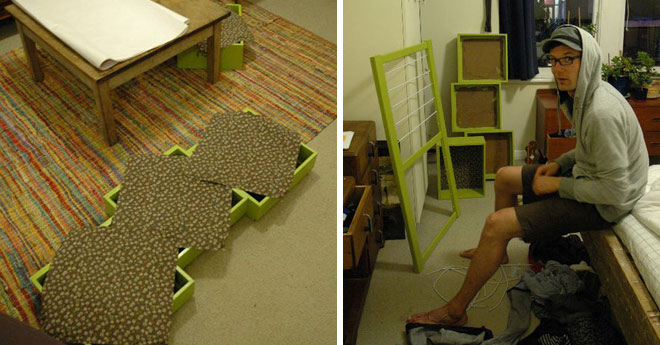
MAKING

Preparing the drawers before going on the wall, and painting the new pulley rack. They followed our Pulley Rack Project instructions from World Sweet World Magazine issue #8 – you can check out the whole project here.

NEW WORKSPACE ALL DONE

Thanks, Bonnie, Matt and Theo!

-Thomas

The Pulley Rack: Your Rainy Day or Gardenless Clothes Drying Solution

Saturday, October 23rd, 2010

I dream of being able to string up a clothes line from my bedroom window to the ones on the other side; our busy city street transformed into a lazy village lane, our washing waving in the wind like bunting. Sadly, it is not to be – the windows opposite belong to a huge office block and undies flapping about outside is simply not the corporate way.

We have had to come up with a less obtrusive way to dry our clothes; the Pulley Drying Rack, not so picturesque but just as old skool. Known in another gender stereotyped life as a Lazy Betty or a Pulley Maid, the Pulley Drying Rack is friend to all who dwell in abodes without gardens and friendly neighbours across the street.

GETTING STARTED

  1. Work out where you would like your indoor clothesline. Think about roof height, usual temperature of the room, sunshine, and proximity to the washing machine. We chose the
    laundry. You’ll be screwing it to the ceiling, so you’ll need to note where the studs are. A stud-finder can help with this, and they’re pretty inexpensive from the hardware store.
  2. Dig around at the dump shop or building recyclers for a frame. Think framing in old cupboards or cupboard doors, or even louvred doors (you’d have to cut the louvres out). Look for a sturdy frame that doesn’t weigh too much. Alternatively, if all else fails, grab four lengths of wood and make the frame yourself, using a screw for each corner.
  3. Evenly space the screw eyes horizontally on the inside along the frame. Pre-drilling with a tiny drill bit makes screwing in the eyes a whole lot easier. Do this on two sides of the frame, making sure the screw eyes are directly opposite each other FIG 1.
  4. Cut your plastic-coated curtain wire into lengths, about 7cm shorter than the inside width of the frame. Screw a screw hook into each end of each curtain wire (the wire is a bit like a tightly-wound spring, so they’ll screw in, but it’ll be a tight fit). Each curtain wire has to stretch a bit now when you hook it up FIG 2.
  5. Drill four vertical holes, one on each corner of the frame FIG 3.
  6. Cut two lengths of rope as long as the width of the frame, add 50% again. These need to be
    exactly the same lengths (I’ll call these now the support ropes). In the middle of each of these
    support ropes tie in a loop.
  7. Feed each of the ends through a corner hole that you have just drilled, then tie a gnarly knot on the end so they can’t fit back through. These should form an ‘A’ shape on each end of the frame FIG 4. You now have your main structure sorted, the next is to attach it to the roof!
  8. In the ceiling you need to find where the cross beams in your roof are located. You need to drill two holes through the ceiling into these crossbeams in order to attach the big hooks. The hooks, and therefore the holes, need to be above the middle of the two ‘A’ frame support ropes. Accurate
    positioning is crucial.
  9. Screw in the big hooks, then hang the pulleys onto them.
  10. In the same way you found a strong bit to screw in the hooks, now place and attach another hook at waist height on a wall (where the clothesline will eventually be anchored) and the eyelet, or a double pulley, in the junction of the ceiling and wall above this last hook.
  11. A length of the wax coated rope now needs to be tied to each of the loops in the middle of the support ropes. These lengths of rope will both individually go up, through the appropriate
    pulley, then together pass through the big eyelet, then be tied off together in two positions FIG 5. Firstly, the longest part, where the lowered clothesline will sit when you are hanging up the washing, and secondly, a knot further up the rope, where the clothesline will be anchored when it is pulled up close to the ceiling.

MAINTENANCE

Every so often make sure the anchor hooks and eyelets are all still secure and safe. When it comes to drying clothes this rack is a life saver but it would knock you for six if it dropped on your head. Eek.

EXTRA TIP

An extra benefit of this drying rack is that we have all become arm wrestling champions since having to heave it up and down on a regular basis. Seriously though, if we were to do this again we’d tee up some sort of counter weight system so it’s less of a strain to pull up when laden with wet clothes. If you’re not up to that task, just make a smaller rack.

Frankenstein’s drawers

Wednesday, March 24th, 2010

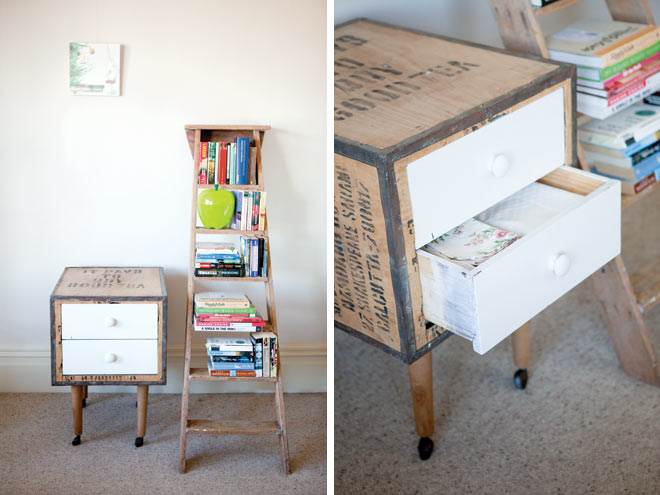
I have often thought about the aesthetic of reused and recycled rather than store-bought materials. What I’ve noticed is that things made from old stuff always seems to come out on top when it comes to character and uniqueness. This little chest of drawers is a case in point.

Our Frankenstein's Drawers made out of tea-boxes

The starting point for this project was a few wooden tea boxes we found under our house, and while they’re great boxes, they are a bit too high for a bedside table, not sturdy enough for a TV stand, and too chunky for desk legs. In all their prettiness, we always felt that they had to serve a higher purpose. We started thinking laterally about the box. Often you have an idea or a concept to begin with, but it this case it was the material that was the starting point for the creative process. Lying on its side with the box’s top opening pointing forward, the idea for a chest of drawers evolved.

Because of the project depending so much on the material you can get hold of, this is not a strict step-by-step project to copy, but rather ideas and tips for the design process behind a project similar to this.

SOURCING THE MATERIAL

The ‘box': This is where you have absolute creative freedom – a variety of wooden boxes work; if you don’t have awesome tea boxes like us, you could use old gutted chests, wooden packaging or crates, or even sturdy suitcases (wow, that’ll be my next project!).
Drawers: Being on the lookout for drawers that might fit (so I didn’t have to build new ones), I was lucky enough to find a cheap desk at the op shop with drawers which fell into my range of “could fit” dimensions.

Legs: We had four legs from an old bed-base lying around that we wanted to put to use, so the decision about composition was made for us. With these slender, long legs, I envisaged something like a love child of a Cheetah and “A Grand Day Out with Wallace and Gromit”’s slightly deranged vending machine “the Cooker”. Of course, you could use any type of legs you want, even pimp it out with swivel top casters, which would make assembly quite easy but can be quite pricy.
Interior material: I used scrap material from my workshop for the interior of the box, otherwise I would have used pieces from the second hand desk I bought for this project.

FIT THE DRAWERS

1. I measured the drawers and trimmed the opening in the box appropriately, so the drawers would sit snugly without gaps.

Illustrating the construction Figs 1, 2a and 2b

BOX INTERIOR

2. The construction I built inside the box had to be sturdy and smooth enough for the drawers to sit and run on easily.
Basically, you need two rails running front to back for each drawer, and two sturdy crossbars per drawer that the rails sit on FIG 1. To figure out how to construct this, you need to have a closer look at your drawers (yes, indeed). Usually, drawers’ bases
are set slightly up from the bottom, so that the drawer actually runs on its sides, not the bottom. In this case though, I figured
the easiest thing to do was to have the drawer’s base run on two rails, sitting just inside the sides FIG 2a.

Make sure that the rails are a bit taller than the distance between the drawer’s base and the bottom of its sides,
otherwise the drawer will catch on the crossbars when closing.

If the bottom of your drawers are not sturdy or straight enough, your drawers’ sides have to run on the rails. If this is
the case, attach a strip to the rails on either side of the drawer to keep it in place as it slides along FIG 2b.

3. The rail method you choose will inform the height the crossbars are attached at. If you have the drawers sitting on
top of the rails, you need to lower the crossbars appropriately, by the height of the rails.

4. To attach the crossbars, hold them in place on the inside and at the same time drill from the outside through the box’s wall
into the end grain of the crossbars, then screw in place FIG 3.

5. Attach the rails onto the crossbars. Make sure they fit the drawers’ widths, and stop the drawers from sliding in too far. TIP: All elements need to come together correctly to have the drawers sit perfectly in the opening and to prevent the drawers from jarring, so make little sketches first, then measure and then sketch some more – it’s all part of the fun design process.

Illustrating the construction Figs 3, 4 and 5

GIVING IT LEGS

6. The legs I used have a thread at the top FIG 4, which I figured would be quite sturdy to attach them with. As counterparts for the threads, I attached two lengths of wood to the inside bottom of the box – one counterpart to hold the front legs and the other for the back ones. With a hole saw, I cut two holes from the outside through the box bottom into the lengths of wood tomatch the intended position of the legs. By cutting the holes slightly smaller in diameter than the thread, I then just had to twist the legs through the bottom of the box into the holes. They cut a slight thread into the counterparts and by doing so automatically tightened up nicely. No further screws or glue needed FIG 5!

FINISHING TOUCHES

7. The tea box has nice print on it – “It pays to buy good tea”, so I didn’t give it another finish. The drawers were white, so that worked as a nice contrast to the overall wood look. A bit of candlewax on the rails and drawer bottoms makes a hell of a difference in making the drawers run smoothly. “Alive! It’s alive!”

Materials and tools, skills, cost and speed

Furniture recycling

Friday, October 9th, 2009

This just flew in from Refugee Services:

“RECYCLE YOUR FURNITURE – GIVE TO REFUGEES!!

We accept good quality furniture (no stains, rips or holes please) to give to refugees arriving in New Zealand under the United Nations quota program. Beds, couches, dining tables and chairs, and chests of drawers are what we need most.

Sorry we don’t accept personal items or bric a brac. Aucklanders can drop off clothing at the Mangere Refugee Reception Centre – please contact (09) 276 6423 for details.

Offices are in Auckland, Hamilton, Palmerston North, Porirua, Hutt Valley, Wellington, Nelson, and Christchurch – go to www.refugeeservices.org.nz for contact details of your nearest office. Some offices have a van and drivers to pickup furniture.

Interested in volunteering? Go here
.”