This project by Thomas Schickedanz appeared in our latest issue of World Sweet World: Issue #9. Photos by Kate McPherson.
I have often thought about the aesthetic of reused and recycled rather than store-bought materials. What I’ve noticed is that things made from old stuff always seems to come out on top when it comes to character and uniqueness. This little chest of drawers is a case in point.
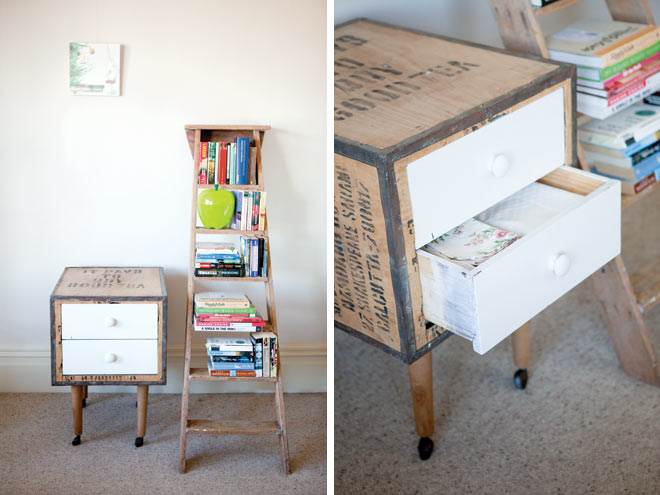
The starting point for this project was a few wooden tea boxes we found under our house, and while they’re great boxes, they are a bit too high for a bedside table, not sturdy enough for a TV stand, and too chunky for desk legs. In all their prettiness, we always felt that they had to serve a higher purpose. We started thinking laterally about the box. Often you have an idea or a concept to begin with, but it this case it was the material that was the starting point for the creative process. Lying on its side with the box’s top opening pointing forward, the idea for a chest of drawers evolved.
Because of the project depending so much on the material you can get hold of, this is not a strict step-by-step project to copy, but rather ideas and tips for the design process behind a project similar to this.
The ‘box’: This is where you have absolute creative freedom – a variety of wooden boxes work; if you don’t have awesome tea boxes like us, you could use old gutted chests, wooden packaging or crates, or even sturdy suitcases (wow, that’ll be my next project!).
Drawers: Being on the lookout for drawers that might fit (so I didn’t have to build new ones), I was lucky enough to find a cheap desk at the op shop with drawers which fell into my range of “could fit” dimensions.
Legs: We had four legs from an old bed-base lying around that we wanted to put to use, so the decision about composition was made for us. With these slender, long legs, I envisaged something like a love child of a Cheetah and “A Grand Day Out with Wallace and Gromit‒s slightly deranged vending machine “the Cooker”. Of course, you could use any type of legs you want, even pimp it out with swivel top casters, which would make assembly quite easy but can be quite pricy.
Interior material: I used scrap material from my workshop for the interior of the box, otherwise I would have used pieces from the second hand desk I bought for this project.
1. I measured the drawers and trimmed the opening in the box appropriately, so the drawers would sit snugly without gaps.

2. The construction I built inside the box had to be sturdy and smooth enough for the drawers to sit and run on easily.
Basically, you need two rails running front to back for each drawer, and two sturdy crossbars per drawer that the rails sit on FIG 1. To figure out how to construct this, you need to have a closer look at your drawers (yes, indeed). Usually, drawers’ bases
are set slightly up from the bottom, so that the drawer actually runs on its sides, not the bottom. In this case though, I figured
the easiest thing to do was to have the drawer’s base run on two rails, sitting just inside the sides FIG 2a.
Make sure that the rails are a bit taller than the distance between the drawer’s base and the bottom of its sides,
otherwise the drawer will catch on the crossbars when closing.
If the bottom of your drawers are not sturdy or straight enough, your drawers’ sides have to run on the rails. If this is
the case, attach a strip to the rails on either side of the drawer to keep it in place as it slides along FIG 2b.
3. The rail method you choose will inform the height the crossbars are attached at. If you have the drawers sitting on
top of the rails, you need to lower the crossbars appropriately, by the height of the rails.
4. To attach the crossbars, hold them in place on the inside and at the same time drill from the outside through the box’s wall
into the end grain of the crossbars, then screw in place FIG 3.
5. Attach the rails onto the crossbars. Make sure they fit the drawers’ widths, and stop the drawers from sliding in too far. TIP: All elements need to come together correctly to have the drawers sit perfectly in the opening and to prevent the drawers from jarring, so make little sketches first, then measure and then sketch some more – it’s all part of the fun design process.

6. The legs I used have a thread at the top FIG 4, which I figured would be quite sturdy to attach them with. As counterparts for the threads, I attached two lengths of wood to the inside bottom of the box – one counterpart to hold the front legs and the other for the back ones. With a hole saw, I cut two holes from the outside through the box bottom into the lengths of wood tomatch the intended position of the legs. By cutting the holes slightly smaller in diameter than the thread, I then just had to twist the legs through the bottom of the box into the holes. They cut a slight thread into the counterparts and by doing so automatically tightened up nicely. No further screws or glue needed FIG 5!
7. The tea box has nice print on it – “It pays to buy good teaâ€, so I didn’t give it another finish. The drawers were white, so that worked as a nice contrast to the overall wood look. A bit of candlewax on the rails and drawer bottoms makes a hell of a difference in making the drawers run smoothly. “Alive! It’s alive!”

