Frankenstein’s drawers

March 24th, 2010

I have often thought about the aesthetic of reused and recycled rather than store-bought materials. What I’ve noticed is that things made from old stuff always seems to come out on top when it comes to character and uniqueness. This little chest of drawers is a case in point.
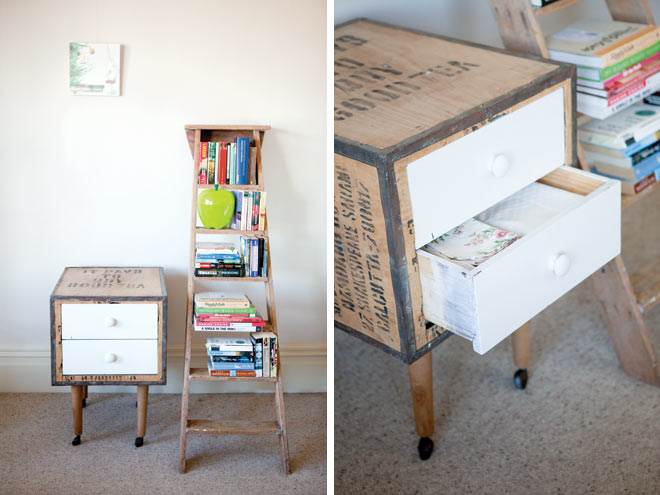
Our Frankenstein's Drawers made out of tea-boxes

The starting point for this project was a few wooden tea boxes we found under our house, and while they’re great boxes, they are a bit too high for a bedside table, not sturdy enough for a TV stand, and too chunky for desk legs. In all their prettiness, we always felt that they had to serve a higher purpose. We started thinking laterally about the box. Often you have an idea or a concept to begin with, but it this case it was the material that was the starting point for the creative process. Lying on its side with the box’s top opening pointing forward, the idea for a chest of drawers evolved.

Because of the project depending so much on the material you can get hold of, this is not a strict step-by-step project to copy, but rather ideas and tips for the design process behind a project similar to this.

SOURCING THE MATERIAL

The ‘box': This is where you have absolute creative freedom – a variety of wooden boxes work; if you don’t have awesome tea boxes like us, you could use old gutted chests, wooden packaging or crates, or even sturdy suitcases (wow, that’ll be my next project!).
Drawers: Being on the lookout for drawers that might fit (so I didn’t have to build new ones), I was lucky enough to find a cheap desk at the op shop with drawers which fell into my range of “could fit” dimensions.

Legs: We had four legs from an old bed-base lying around that we wanted to put to use, so the decision about composition was made for us. With these slender, long legs, I envisaged something like a love child of a Cheetah and “A Grand Day Out with Wallace and Gromit”’s slightly deranged vending machine “the Cooker”. Of course, you could use any type of legs you want, even pimp it out with swivel top casters, which would make assembly quite easy but can be quite pricy.
Interior material: I used scrap material from my workshop for the interior of the box, otherwise I would have used pieces from the second hand desk I bought for this project.

FIT THE DRAWERS

1. I measured the drawers and trimmed the opening in the box appropriately, so the drawers would sit snugly without gaps.

Illustrating the construction Figs 1, 2a and 2b

BOX INTERIOR

2. The construction I built inside the box had to be sturdy and smooth enough for the drawers to sit and run on easily.
Basically, you need two rails running front to back for each drawer, and two sturdy crossbars per drawer that the rails sit on FIG 1. To figure out how to construct this, you need to have a closer look at your drawers (yes, indeed). Usually, drawers’ bases
are set slightly up from the bottom, so that the drawer actually runs on its sides, not the bottom. In this case though, I figured
the easiest thing to do was to have the drawer’s base run on two rails, sitting just inside the sides FIG 2a.

Make sure that the rails are a bit taller than the distance between the drawer’s base and the bottom of its sides,
otherwise the drawer will catch on the crossbars when closing.

If the bottom of your drawers are not sturdy or straight enough, your drawers’ sides have to run on the rails. If this is
the case, attach a strip to the rails on either side of the drawer to keep it in place as it slides along FIG 2b.

3. The rail method you choose will inform the height the crossbars are attached at. If you have the drawers sitting on
top of the rails, you need to lower the crossbars appropriately, by the height of the rails.

4. To attach the crossbars, hold them in place on the inside and at the same time drill from the outside through the box’s wall
into the end grain of the crossbars, then screw in place FIG 3.

5. Attach the rails onto the crossbars. Make sure they fit the drawers’ widths, and stop the drawers from sliding in too far. TIP: All elements need to come together correctly to have the drawers sit perfectly in the opening and to prevent the drawers from jarring, so make little sketches first, then measure and then sketch some more – it’s all part of the fun design process.

Illustrating the construction Figs 3, 4 and 5

GIVING IT LEGS

6. The legs I used have a thread at the top FIG 4, which I figured would be quite sturdy to attach them with. As counterparts for the threads, I attached two lengths of wood to the inside bottom of the box – one counterpart to hold the front legs and the other for the back ones. With a hole saw, I cut two holes from the outside through the box bottom into the lengths of wood tomatch the intended position of the legs. By cutting the holes slightly smaller in diameter than the thread, I then just had to twist the legs through the bottom of the box into the holes. They cut a slight thread into the counterparts and by doing so automatically tightened up nicely. No further screws or glue needed FIG 5!

FINISHING TOUCHES

7. The tea box has nice print on it – “It pays to buy good tea”, so I didn’t give it another finish. The drawers were white, so that worked as a nice contrast to the overall wood look. A bit of candlewax on the rails and drawer bottoms makes a hell of a difference in making the drawers run smoothly. “Alive! It’s alive!”

Materials and tools, skills, cost and speed

Folding stuff

March 22nd, 2010

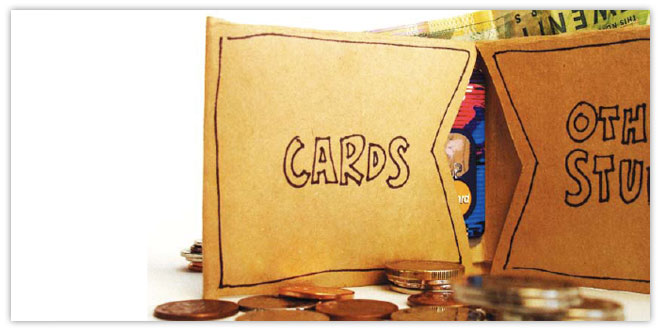
This wallet is super easy to make. You’ll need some paper and cellotape. Yep, that’s it. Grab a vivid and twink if you want to customise it, or use the latest pages from the ace review of the new “Die Die Die” album, if that’s more your thing. Heavier card is slightly more durable and using the front of a manilla folder makes the wallet feel like a freakin’ hummer.
Paper wallet

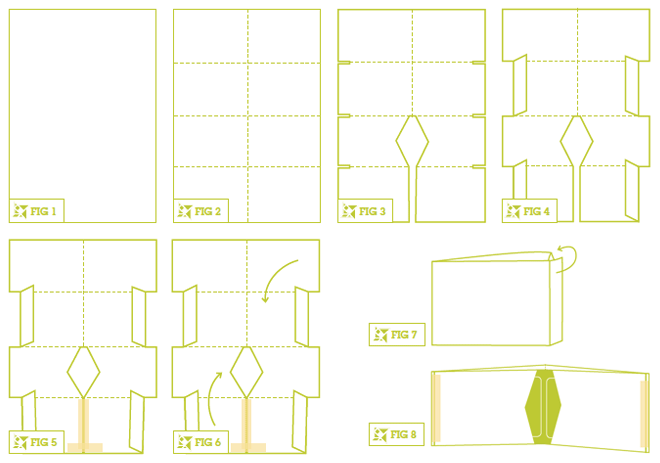
  1. Start with a piece of A4 or similar – slightly bigger is best (about the size of Real Groove Magazine pages is excellent). FIG 1
  2. Crease by folding in half and half again, and then again so your page is divided into eight. FIG 2
  3. Cut as shown. You’ll need slits in the side and the cut out diamond becomes the card holder part. FIG 3
  4. Make some flaps out of the bottom and top sections. These will eventually fold into the wallet and seal it up so your cards don’t drop out the side. FIG 4
  5. Tape the bottom bits back together so both sides are flush. It will seem kind of wonky now but it all will be revealed soon. FIG 5
  6. Fold the top and the bottom quarters in, FIG 6 then fold in half and you should have something like FIG 7 with the flaps poking out the side.
  7. Tuck the flaps into the hole you’ve just created and this will effectively lock the wallet together. You can use tape if you want to be extra sure nothing’s going to fall out.
  8. You should have something that looks a bit like FIG 8. Your cash goes in the back and your cards go in the 2 easy access pockets at front. Sorted.

Illustrations for 'Folding stuff'

Our final subscription winner

March 22nd, 2010

We just determined our final subscription winner in a ceremonial draw. Jamin Vollebregt, from Island Bay in Wellington, you won the book “Martha goes Green: A Vegetarian Cookbook”. Yay!

Martha goes green: a vegetarian cookbook

My mamachari

March 21st, 2010

I recently joined the movement for a shift in the means of transport by acquiring a brand-new, second-hand mamachari bicycle. The reason for getting the bike though was to have a classier, more leisurely way of getting around every day. When I finally put it to use, cycling back home from the city, a slight feeling of warm melancholy overcame me, being reminded of cruising through my home city of Hamburg.

My mamachari bike on our street

Responsible for my new-found joy of cycling in New Zealand are Sarah and Jason, our downstairs neighbours, who imported the mamachari bikes from Japan, to imprint Wellington streets with new, bike-friendly, city-life looks. A brand new website with all details will be up at mamachari.co.nz soon.

My mamachari bike in our kitchen

Thomas

Fantastic March Craft 2.0

March 7th, 2010

While Hannah and Thomas were jet-setting off to a wedding, I swung out to The New Dowse for Craft 2.0 to meet some lovely crafters, sell some magazines and console those who had just heard the news that this beautiful new issue will be the final one.  When I see Hannah and Thomas on Tuesday, I’ll be passing on all your lovely messages of thanks, congratulations and just how many people will be missing their quarterly hit of crafty goodness.

Craft 2.0 was a great hit – I met lots of beautiful people, some of whom had never been before! There were so many amazing stalls – I was almost glad I didn’t have my wallet with me – I think I would be broke or seriously in debt if I’d been seduced into buying everything that took my fancy.

There were moments of being absolutely swamped with enthusiastic makers, and those who stuck around too long had to check out my awesome hand modelling poses from my experiences with the photo shoot.  (Check p. 27 for my ‘hand’iwork.) I hope you all had a great day out there, and thanks to everyone who stopped by.

In other news, after compiling the Magpie’s Nest for the latest issue, I’ve found that Giles Speeden, who creates the book carvings, has now got a blog site to show off his works – check it out here.

xx Libby

Thank you, and goodnight

March 2nd, 2010

Dear all readers,

It’s two years ago this month that we published the first issue of World Sweet World, and the speed at which our little mag for makers and doers was embraced by the creative, crafty community of New Zealand (and beyond!) just blew our minds.

We wanted to make World Sweet World an inclusive, sharing sort of publication, and that baton has been taken up and run with by so many of you. Since the third or fourth issue, we’ve had a constant flow of new content pour in, supplied almost entirely by people we’ve never met. It’s been incredibly exciting to open our inbox each morning to read messages from people wanting to share their ideas with our readers.

Big changes are ahead here at World Sweet World HQ, and we’ve been having a big think about the future of our mag over the last couple of months. We’re excited to announce: we’re having a baby in July! So this really made us re-evaluate what we’ll be able to manage over the next years. While we utterly enjoy putting World Sweet World together, the magazine has been a labour of love (and not money) for the last couple of years. We don’t see ourselves being able to put nearly the amount of time and energy into it once we have another little project to pour our time into. It’s been an absolute pleasure, lots of fun, and a great learning curve, but we have decided to put the mag to rest, with this being our last issue.

We’re keeping the blog ticking over, so if you have projects or articles you’re still busting to share, do get in touch. We’ll also be adding projects and articles from past issues, plus, due to popular demand, we’re working on enabling you to buy digital copies of sold out back issues. One of our favourite parts of putting each new issue together has been commissioning new artwork by such incredibly talented illustrators. We’ve drooled over Devon Smith’s work in Swonderful here in Welly, and were a couple of excited children when she got in touch two months ago to say she’d like to contribute. We’re thrilled with the work she’s done for the cover, and also the adorable illustrations by Sarah McNeil for the Crafty Business article. Hopefully you’ll enjoy them too, along with all the other content we’ve rounded up in this issue.

We’ve been truly proud of each new issue we put out, and we hope we have been able to inspire the makery scene in New Zealand and to make a positive difference to the world we live in. Thanks once again for the overwhelming support you’ve shown us over the course of this adventure.

Thank you, and goodnight – Hannah & Thomas

A good brew

February 28th, 2010

I don’t shy away from it – I’m a tea fiend. I love the variety of tea available, the little rituals I associate with sharing a pot of tea – but I’m also not afraid to say that I do enjoy a good cup of coffee.

It gives me a boost, and I don’t really care if it’s just a placebo effect. But what I like is a good coffee – be it plunger, espresso or filter. My definition of a good coffee comes down to the sugar test. If it needs the sugar, it’s probably burnt and not to my taste. I also like a splash of milk to temper the flavour down. My usual cafe order is a soy flat white – I like the creaminess of soy. Yum.

Yet, deep down, I’ve always hankered to be a long black drinker, but the idea of it seemed so scary. Until last week when I discovered Customs Brew Bar at 39 Ghuznee Street.

This cafe is revolutionising coffee as we know it. No take away cups here (the trees whoop in delight) for this is about the experience of true coffee. The cafe invites you to linger, really taste your coffee and chill out. It blends my love of tea rituals with the boost of coffee. You’re not going to order from a strictly espresso menu. The lads and lasses at Customs have 4 different methods of coffee brewing to keep any coffee connoisseur happy. These methods bring out the best flavours from their single origin coffees – no blends here! (For real coffee lovers, check out their blog for more information)

I enjoyed a Clover pot for two of the Kenyan roast – a tarty citrus tasting bean – and as the lovely manager Charlie saw our interest, she explained the process in full. Our cups and pot arrived on a lovely wooden tray, with milk to add if desired (which I didn’t need….yay! Black coffee tasting accomplished). My friend and I lingered an hour or so, tasting some real coffee and doing the general coffee catch up reminisce routine and soaking up the relaxed vibe.

I’ve since been back to try more chocolatey beans, also very very tasty. But I must say – it’s not just the coffee that has me hooked. I really love the attitude of taking time to really savour life’s little treats – flavours, friends and a relaxed atmosphere. I guess it’s the ethos behind the cafe that will draw me in everytime – hopefully this idea of slowing down the pace can spread, bit by bit…

Check it out if you get the chance, otherwise I’d recommend looking out for cafes that encourage the able loiterers…get in and soak up the atmosphere.

xx Libby

P.S I stole all the photos from the blog link above! Credit due elsewhere…

Crunch in your lunch

February 15th, 2010

I’m a big fan of some crunch in my basket lettuce salads – so here’s an easy method of toasting seeds.  I’ve seen bags of ‘salad topping’ in the supermarket, but it’s so easy (and cheap!) to make your own at home.

It’s worthwhile to check out where you can buy seeds in bulk if you use them frequently – they’re not expensive, but you can save some cash if you stock up at somewhere like Moore Wilson’s, Toops or Gilmours.

To make your own salad seed mix, brush a roasting pan with some olive oil and tip in a about 4 cups of seeds.  You can make as much or as little as you like, but I enjoy having a good store on hand to keep me going!  I like to use pumpkin, sunflower, linseed (also known as flax seed) and sesame seeds in my mix.  Mix them around and roast in the oven at around 180 degrees.  About half an hour in the oven will have them nicely crisped – just stir them from time to time.

For extra flavour, add a few splashes of soy sauce or tamari sauce towards the end and mix it around.  Once it has cooled, store the mixture in an airtight container.

As well as adding some savoury crunch to salads, it’s a great way to get some protein into your food.  I also like to use this topping for pasta bakes and other miscellaneous meals – it’s very versatile.  It’s also good by itself, although I sometimes melt some honey and stir in the seeds for a snack.

Just make sure you check your teeth after eating – seeds LOVE to stick in your teeth to add some, uh, mystery to your smile…

x Libby

Mt Victoria Inner City Festival

February 6th, 2010

The Mount Victoria festival is coming up, Sat 27th of February (10am-3pm), with workshops around sustainability, food, stalls and live music (wonderful Tessa Rain will be there).

– Thomas

Way to roll

February 5th, 2010

Here’s another Frocks on Bikes event that shouldn’t be missed:

You can celebrate summer, promote taking the lycra out of cycling and normalising it as a means of transportation, enjoy a leisure bike ride to Island Bay, fall in or out of/ be in/ stay in love with your cycling partner, and even be in two win prizes – ALL IN AN AFTERNOON!

All the info and chance to register is available on frocksonbikes.org.

– Thomas