Posts Tagged ‘Magazine project’

The Pulley Rack: Your Rainy Day or Gardenless Clothes Drying Solution

Saturday, October 23rd, 2010

I dream of being able to string up a clothes line from my bedroom window to the ones on the other side; our busy city street transformed into a lazy village lane, our washing waving in the wind like bunting. Sadly, it is not to be – the windows opposite belong to a huge office block and undies flapping about outside is simply not the corporate way.

We have had to come up with a less obtrusive way to dry our clothes; the Pulley Drying Rack, not so picturesque but just as old skool. Known in another gender stereotyped life as a Lazy Betty or a Pulley Maid, the Pulley Drying Rack is friend to all who dwell in abodes without gardens and friendly neighbours across the street.

GETTING STARTED

  1. Work out where you would like your indoor clothesline. Think about roof height, usual temperature of the room, sunshine, and proximity to the washing machine. We chose the
    laundry. You’ll be screwing it to the ceiling, so you’ll need to note where the studs are. A stud-finder can help with this, and they’re pretty inexpensive from the hardware store.
  2. Dig around at the dump shop or building recyclers for a frame. Think framing in old cupboards or cupboard doors, or even louvred doors (you’d have to cut the louvres out). Look for a sturdy frame that doesn’t weigh too much. Alternatively, if all else fails, grab four lengths of wood and make the frame yourself, using a screw for each corner.
  3. Evenly space the screw eyes horizontally on the inside along the frame. Pre-drilling with a tiny drill bit makes screwing in the eyes a whole lot easier. Do this on two sides of the frame, making sure the screw eyes are directly opposite each other FIG 1.
  4. Cut your plastic-coated curtain wire into lengths, about 7cm shorter than the inside width of the frame. Screw a screw hook into each end of each curtain wire (the wire is a bit like a tightly-wound spring, so they’ll screw in, but it’ll be a tight fit). Each curtain wire has to stretch a bit now when you hook it up FIG 2.
  5. Drill four vertical holes, one on each corner of the frame FIG 3.
  6. Cut two lengths of rope as long as the width of the frame, add 50% again. These need to be
    exactly the same lengths (I’ll call these now the support ropes). In the middle of each of these
    support ropes tie in a loop.
  7. Feed each of the ends through a corner hole that you have just drilled, then tie a gnarly knot on the end so they can’t fit back through. These should form an ‘A’ shape on each end of the frame FIG 4. You now have your main structure sorted, the next is to attach it to the roof!
  8. In the ceiling you need to find where the cross beams in your roof are located. You need to drill two holes through the ceiling into these crossbeams in order to attach the big hooks. The hooks, and therefore the holes, need to be above the middle of the two ‘A’ frame support ropes. Accurate
    positioning is crucial.
  9. Screw in the big hooks, then hang the pulleys onto them.
  10. In the same way you found a strong bit to screw in the hooks, now place and attach another hook at waist height on a wall (where the clothesline will eventually be anchored) and the eyelet, or a double pulley, in the junction of the ceiling and wall above this last hook.
  11. A length of the wax coated rope now needs to be tied to each of the loops in the middle of the support ropes. These lengths of rope will both individually go up, through the appropriate
    pulley, then together pass through the big eyelet, then be tied off together in two positions FIG 5. Firstly, the longest part, where the lowered clothesline will sit when you are hanging up the washing, and secondly, a knot further up the rope, where the clothesline will be anchored when it is pulled up close to the ceiling.

MAINTENANCE

Every so often make sure the anchor hooks and eyelets are all still secure and safe. When it comes to drying clothes this rack is a life saver but it would knock you for six if it dropped on your head. Eek.

EXTRA TIP

An extra benefit of this drying rack is that we have all become arm wrestling champions since having to heave it up and down on a regular basis. Seriously though, if we were to do this again we’d tee up some sort of counter weight system so it’s less of a strain to pull up when laden with wet clothes. If you’re not up to that task, just make a smaller rack.

Curtain call: part one

Friday, April 23rd, 2010

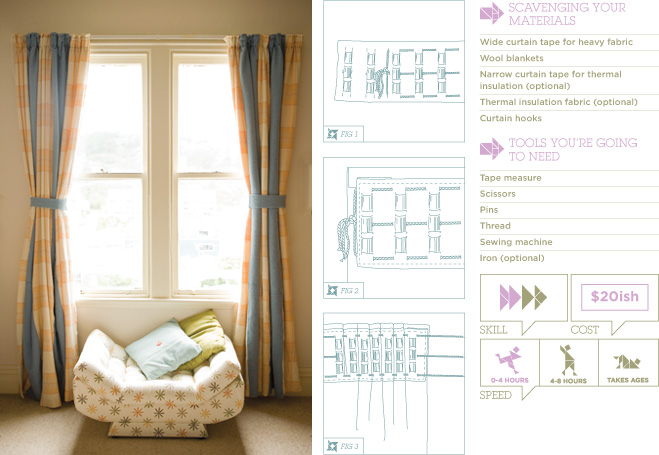
Homemade blanket curtains

This project by Christine Reitze was published last autumn in issue 5 of World Sweet World. Stay tuned for more curtain-related goodies next week – I’ve been sewing up a storm in preparation for the chilly months ahead. ~ Hannah

It’s always good to be prepared, so here’s an autumn project that will get you ready for winter. In the grand scheme of things, winters in New Zealand aren’t really that cold, but because of practically nonexistent insulation in many of our houses (especially flats), we tend to feel it more than chillier countries.

If you’re flatting in a cold house, chances are your landlord isn’t going to fork out to get the entire place re-insulated (although it’s worth speaking with them about the EECA energywise funding scheme), but there are things as tenants we can do to keep a bit warmer as winter approaches.

These warm woolly winter curtains are sewn with old blankets you can find easily in op-shops for cheap, or if you’re brave enough, you could pinch them from your granny or your dog. For even more warmth you can add thermal lining (you can use your old curtains for this), which is then hooked onto the main wool curtain.

  1. Measure the length of your curtain track and double it, adding an extra 12cm. This is how much of wide curtain tape you’ll need.
  2. If you decide to have the extra thermal insulation you will need to buy the same length of narrow curtain tape for it. Make sure that the wide tape of your woolly curtain can be used to hook the lining onto (they can tell you this in the shop).
  3. Decide how long you want your curtain to be, and add 5cm. I reckon down to the floor looks best, plus it provides far more insulation that way. If you want to hem your curtain you will need to add extra length, but wool blankets are usually nicely hemmed anyway.
  4. Make each of your two curtains the width of the curtain track. Depending on the size of your wool blankets, you might need to cut off or sew more blanket material on to get the right dimension for your window. You can get creative here and sew stripes, have a different coloured border or make a woollen patchwork. If you sew two different blankets together, make sure you pin them first (even if pinning isn’t usually your style). Different weights of blanket will stretch differently, and you’ll end up with one piece that looks flabby like the knees in a cheap pair of trackies. Not cool. How to sew the tape on
  5. Cut the curtain tape in half. Before you start sewing, unthread the three cords 3cm from one end of the tape. Tie the cords together, then smooth out the tape  FIG 1.
  6. Place the tape right side up on the panel, 2cm below the edge of the curtain. Fold in the excess tape 3cm from each end and pin the tape in place.
    Sew the top edge of the tape about ½ a cm from its edge onto the curtain and repeat the process with the bottom edge  FIG 2. Be careful not to sew over the string!
  7. Pull all strings at the unknotted end at the same time, gathering your curtain to the desired width  FIG 3. It should end up half the curtain track plus about 40cm. Knot the three strings together and cut the excess off.
  8. Insert hooks into the middle of every second or third loop of the tape.
  9. Repeat the same process with your second curtain panel, hang them up and feel the instant warmth! For extra thermal insulation
  10. To add extra warmth to your woolly drapes, you can make an ungathered thermal backing. For the width, measure the gathered width of your wool curtain and add an extra 20cm. The length will be the same as the wool curtains, minus 20cm.
  11. Fold the side edge of your lining over 5cm and iron, then fold it over another 5cm, iron and sew in place. Repeat the process with the other side.
    Pin the lining tape on, folding 3cm under at the edges, and sew in place, as you did in step 7.
  12. Insert hooks into every fourth loop and hook the lining onto the bottom row of loops on the curtain tape.

If you’ve taken old curtains down from your windows, these will work just as well for lining. All you have to do is move the hooks from the middle of the tape to the top, hook them onto your curtain, and you’re sorted!

Frankenstein’s drawers

Wednesday, March 24th, 2010

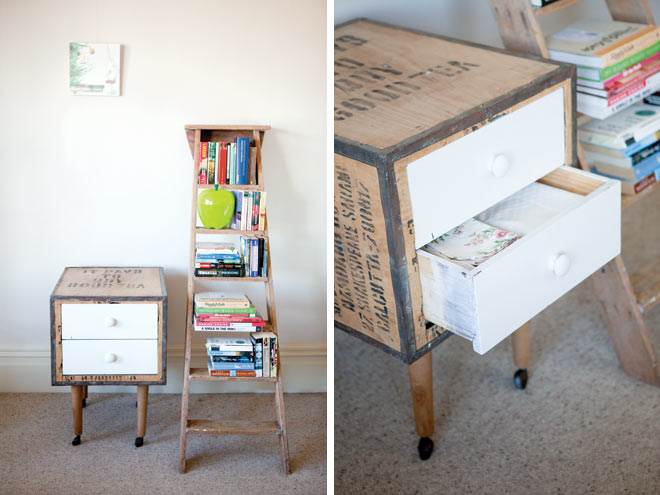
I have often thought about the aesthetic of reused and recycled rather than store-bought materials. What I’ve noticed is that things made from old stuff always seems to come out on top when it comes to character and uniqueness. This little chest of drawers is a case in point.

Our Frankenstein's Drawers made out of tea-boxes

The starting point for this project was a few wooden tea boxes we found under our house, and while they’re great boxes, they are a bit too high for a bedside table, not sturdy enough for a TV stand, and too chunky for desk legs. In all their prettiness, we always felt that they had to serve a higher purpose. We started thinking laterally about the box. Often you have an idea or a concept to begin with, but it this case it was the material that was the starting point for the creative process. Lying on its side with the box’s top opening pointing forward, the idea for a chest of drawers evolved.

Because of the project depending so much on the material you can get hold of, this is not a strict step-by-step project to copy, but rather ideas and tips for the design process behind a project similar to this.

SOURCING THE MATERIAL

The ‘box': This is where you have absolute creative freedom – a variety of wooden boxes work; if you don’t have awesome tea boxes like us, you could use old gutted chests, wooden packaging or crates, or even sturdy suitcases (wow, that’ll be my next project!).
Drawers: Being on the lookout for drawers that might fit (so I didn’t have to build new ones), I was lucky enough to find a cheap desk at the op shop with drawers which fell into my range of “could fit” dimensions.

Legs: We had four legs from an old bed-base lying around that we wanted to put to use, so the decision about composition was made for us. With these slender, long legs, I envisaged something like a love child of a Cheetah and “A Grand Day Out with Wallace and Gromit”’s slightly deranged vending machine “the Cooker”. Of course, you could use any type of legs you want, even pimp it out with swivel top casters, which would make assembly quite easy but can be quite pricy.
Interior material: I used scrap material from my workshop for the interior of the box, otherwise I would have used pieces from the second hand desk I bought for this project.

FIT THE DRAWERS

1. I measured the drawers and trimmed the opening in the box appropriately, so the drawers would sit snugly without gaps.

Illustrating the construction Figs 1, 2a and 2b

BOX INTERIOR

2. The construction I built inside the box had to be sturdy and smooth enough for the drawers to sit and run on easily.
Basically, you need two rails running front to back for each drawer, and two sturdy crossbars per drawer that the rails sit on FIG 1. To figure out how to construct this, you need to have a closer look at your drawers (yes, indeed). Usually, drawers’ bases
are set slightly up from the bottom, so that the drawer actually runs on its sides, not the bottom. In this case though, I figured
the easiest thing to do was to have the drawer’s base run on two rails, sitting just inside the sides FIG 2a.

Make sure that the rails are a bit taller than the distance between the drawer’s base and the bottom of its sides,
otherwise the drawer will catch on the crossbars when closing.

If the bottom of your drawers are not sturdy or straight enough, your drawers’ sides have to run on the rails. If this is
the case, attach a strip to the rails on either side of the drawer to keep it in place as it slides along FIG 2b.

3. The rail method you choose will inform the height the crossbars are attached at. If you have the drawers sitting on
top of the rails, you need to lower the crossbars appropriately, by the height of the rails.

4. To attach the crossbars, hold them in place on the inside and at the same time drill from the outside through the box’s wall
into the end grain of the crossbars, then screw in place FIG 3.

5. Attach the rails onto the crossbars. Make sure they fit the drawers’ widths, and stop the drawers from sliding in too far. TIP: All elements need to come together correctly to have the drawers sit perfectly in the opening and to prevent the drawers from jarring, so make little sketches first, then measure and then sketch some more – it’s all part of the fun design process.

Illustrating the construction Figs 3, 4 and 5

GIVING IT LEGS

6. The legs I used have a thread at the top FIG 4, which I figured would be quite sturdy to attach them with. As counterparts for the threads, I attached two lengths of wood to the inside bottom of the box – one counterpart to hold the front legs and the other for the back ones. With a hole saw, I cut two holes from the outside through the box bottom into the lengths of wood tomatch the intended position of the legs. By cutting the holes slightly smaller in diameter than the thread, I then just had to twist the legs through the bottom of the box into the holes. They cut a slight thread into the counterparts and by doing so automatically tightened up nicely. No further screws or glue needed FIG 5!

FINISHING TOUCHES

7. The tea box has nice print on it – “It pays to buy good tea”, so I didn’t give it another finish. The drawers were white, so that worked as a nice contrast to the overall wood look. A bit of candlewax on the rails and drawer bottoms makes a hell of a difference in making the drawers run smoothly. “Alive! It’s alive!”

Materials and tools, skills, cost and speed

Folding stuff

Monday, March 22nd, 2010

This wallet is super easy to make. You’ll need some paper and cellotape. Yep, that’s it. Grab a vivid and twink if you want to customise it, or use the latest pages from the ace review of the new “Die Die Die” album, if that’s more your thing. Heavier card is slightly more durable and using the front of a manilla folder makes the wallet feel like a freakin’ hummer.
Paper wallet

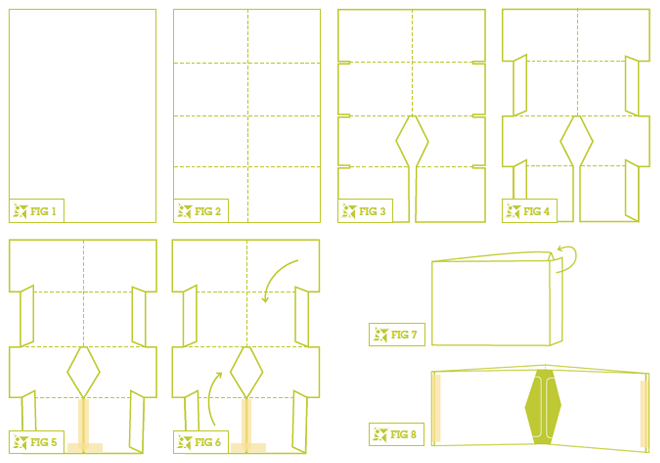
  1. Start with a piece of A4 or similar – slightly bigger is best (about the size of Real Groove Magazine pages is excellent). FIG 1
  2. Crease by folding in half and half again, and then again so your page is divided into eight. FIG 2
  3. Cut as shown. You’ll need slits in the side and the cut out diamond becomes the card holder part. FIG 3
  4. Make some flaps out of the bottom and top sections. These will eventually fold into the wallet and seal it up so your cards don’t drop out the side. FIG 4
  5. Tape the bottom bits back together so both sides are flush. It will seem kind of wonky now but it all will be revealed soon. FIG 5
  6. Fold the top and the bottom quarters in, FIG 6 then fold in half and you should have something like FIG 7 with the flaps poking out the side.
  7. Tuck the flaps into the hole you’ve just created and this will effectively lock the wallet together. You can use tape if you want to be extra sure nothing’s going to fall out.
  8. You should have something that looks a bit like FIG 8. Your cash goes in the back and your cards go in the 2 easy access pockets at front. Sorted.

Illustrations for 'Folding stuff'

Creamy Chickweed Pesto

Tuesday, December 22nd, 2009

This recipe is written by Johanna Knox (starcooked.blogspot.com)

Find out all about Chickweed (and Puha, aka Sow Thistle) here!

Ingredients

1 clove garlic
2 big pinches salt
2 cups chickweed snipped up and loosely packed
1/4 cup olive oil
1/2 cup cashew nuts, soaked for 24 hours (Soaking the nuts adds to the
creaminess and also makes them easier to digest.)
1/3 cup grated parmesan cheese

The pesto is pretty easy to make:

  1. Pound garlic and salt in a mortar.
  2. Gradually add chickweed, continuing to pound.
  3. Gradually add oil and nuts, until you have a smooth, thick paste. Alternatively, use a blender for all ingredients except the parmesan, and then stir in the parmesan at the end.

Makes over 1 cup of pesto. For a variation, substitute other greens or herbs for some of the chickweed. Yum!

Chocolate spice and orange Biscotti

Tuesday, December 8th, 2009

This is from Emma Cowan‘s article on Christmas, “‘Tis the season”, in the latest issue #8 of World Sweet World. We forgot to put the amount of flour in the ingredients list, sorry about that, so here’s the whole recipe.

BiscottiThese snappy biscuits are easy to make; they just take a little time. You bake the dough first, in little log shapes, then slice it thinly and bake it again. This recipe makes around 60.
1. Preheat the oven to 170°C
2. Beat the eggs with the sugar until pale and thick. Add the flour and baking powder, mix together, then divide the dough into two bowls.
3. Add the grated zest of an orange and the almonds to one bowl, and knead until the ingredients are combined and the dough is smooth. Add the cocoa and spices to the other bowl, mix through and then add the chocolate, kneading until combined.
4. Form each bowl of dough into two log shapes, then place on a baking tray with plenty of space between them. Bake them for 25 minutes, then remove to a cooling rack to cool completely (at least an hour).
5. Preheat the oven to 140°C
6. With a sharp knife, cut the logs into 1/2cm slices, then lay them out on a baking tray. Slice on an angle to make long thin shapes.
7. Bake for 15-20 minutes, until the biscotti are dry and just starting to brown. Remove and leave to cool on a rack. They will continue to harden as they cool.

Ingredients

2 cups raw sugar
4 eggs
Rind of one orange
4 cups of plain flour
1 t baking powder
1/2 cup raw almonds (with skin)
1/2 cup chopped chocolate
2 tablespoons cocoa
1 t cinnamon and a pinch of ground cardamom